


Acumu-lación de
pintura a la
derecha o izquier-
da
Acumu-lación de
pintura en la parte
superior o inferior
Acabado
disparejo
Acumu-lación de
pintura en el cen-
tro
Rocío salpicado
Fuja de fluído a través de la
tuerca de empaque de la
aguja
El aire se fuga a través de la
tapa de aire aún sin apretar
el gatillo
El fluído se fuga a través de
la boquilla de la pistola pul-
verizadora a presión
Rocío excesivo
No puede rociar
El tanque no tiene presión
7 Sp
Manual de Instrucciones
Pistolas Pulverizadores Neumátics
2
Operating Instructions
Air Operated Models
Spray Guns
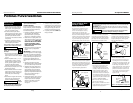
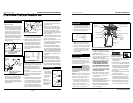
Use a face mask/respira-
tor and protective cloth-
ing when spraying.
Always spray in a well
ventilated area to prevent health and
fire hazards. Refer to Material Safety
Data Sheets (MSDS) of spray material
for details.
Never spray closer than
25 feet to the compres-
sor! If possible, locate
compressor in separate room. Never
spray into the compressor, compressor
controls or the motor.
3. Do not smoke or eat when spraying
paint, insecticides, or other flamma-
ble substances.
Do not spray flammable
materials in vicinity of
open flame or near igni-
tion sources. Motors, electrical equip-
ment and controls can cause electrical
arcs that will ignite a flammable gas or
vapor. Never store flammable liquids
or gases in the vicinity of the compres-
sor.
4. When spraying and cleaning, always
follow the instructions and safety
precautions provided by the material
manufacturer (Refer to MSDS).
Do not spray acids,
corrosive materi-
als, toxic chemicals, fertilizers or pesti-
cides. Using these materials could
result in death or serious injury.
5. Keep visitors away and NEVER allow
children or pets in the work area.
Never aim or
spray at yourself or
anyone else or serious injury could
occur.
6. Always work in a clean environment.
To avoid injury and damage to the
workpiece, do not aim the spray gun
at any dust or debris.
Do not use pressure that
exceeds the operating
pressure of any of the
parts (hoses, fittings, etc.) in the paint-
ing system.
Keep hose away
from sharp objects.
Bursting air hoses may cause injury.
Examine air hoses regularly and replace
if damaged.
7. Always use a pressure regulator on
the air supply to the spray gun.
Failure to install
appropriate
water/oil removal equipment may
result in damage to machinery or work-
piece.
The spray gun is a vital link in any finish-
ing application. In addition to operating
the spray gun properly, techniques of sur-
face preparation and paint preparation
must be understood. These instructions
will explain the differences among various
spray technologies and serve as a guide in
the proper operation and techniques of
spray painting. Refer to the Replacement
Parts Manual for model specific informa-
tion.
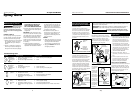
Currently, there are three basic types of
spray guns: Siphon, Pressure, and
Gravity feed (See Figures 2-5). The spray
gun type used depends primarily on the
application and the size of the project.
These types of spray guns can be either
conventional air spray or High Volume
Low Pressure (HVLP).
CONVENTIONAL VS. HVLP
Conventional spray guns use a much
higher air cap pressure to atomize
paint than HVLP spray guns. This results
in more overspray and a lower transfer
efficiency.
HVLP, electrostatic and airless processes
are currently the only compliant spray
methods that meet the strict 65% trans-
fer efficiency criteria required by some air
!
NOTICE
quality management districts. This
enhanced transfer efficiency results in a
significant material savings compared to
conventional spraying. Check local, state
and national regulations that may be in
effect before performing any spraying
operations.
HVLP spraying is a growing trend in the
finishing industry
due to its environ-
mental friendliness.
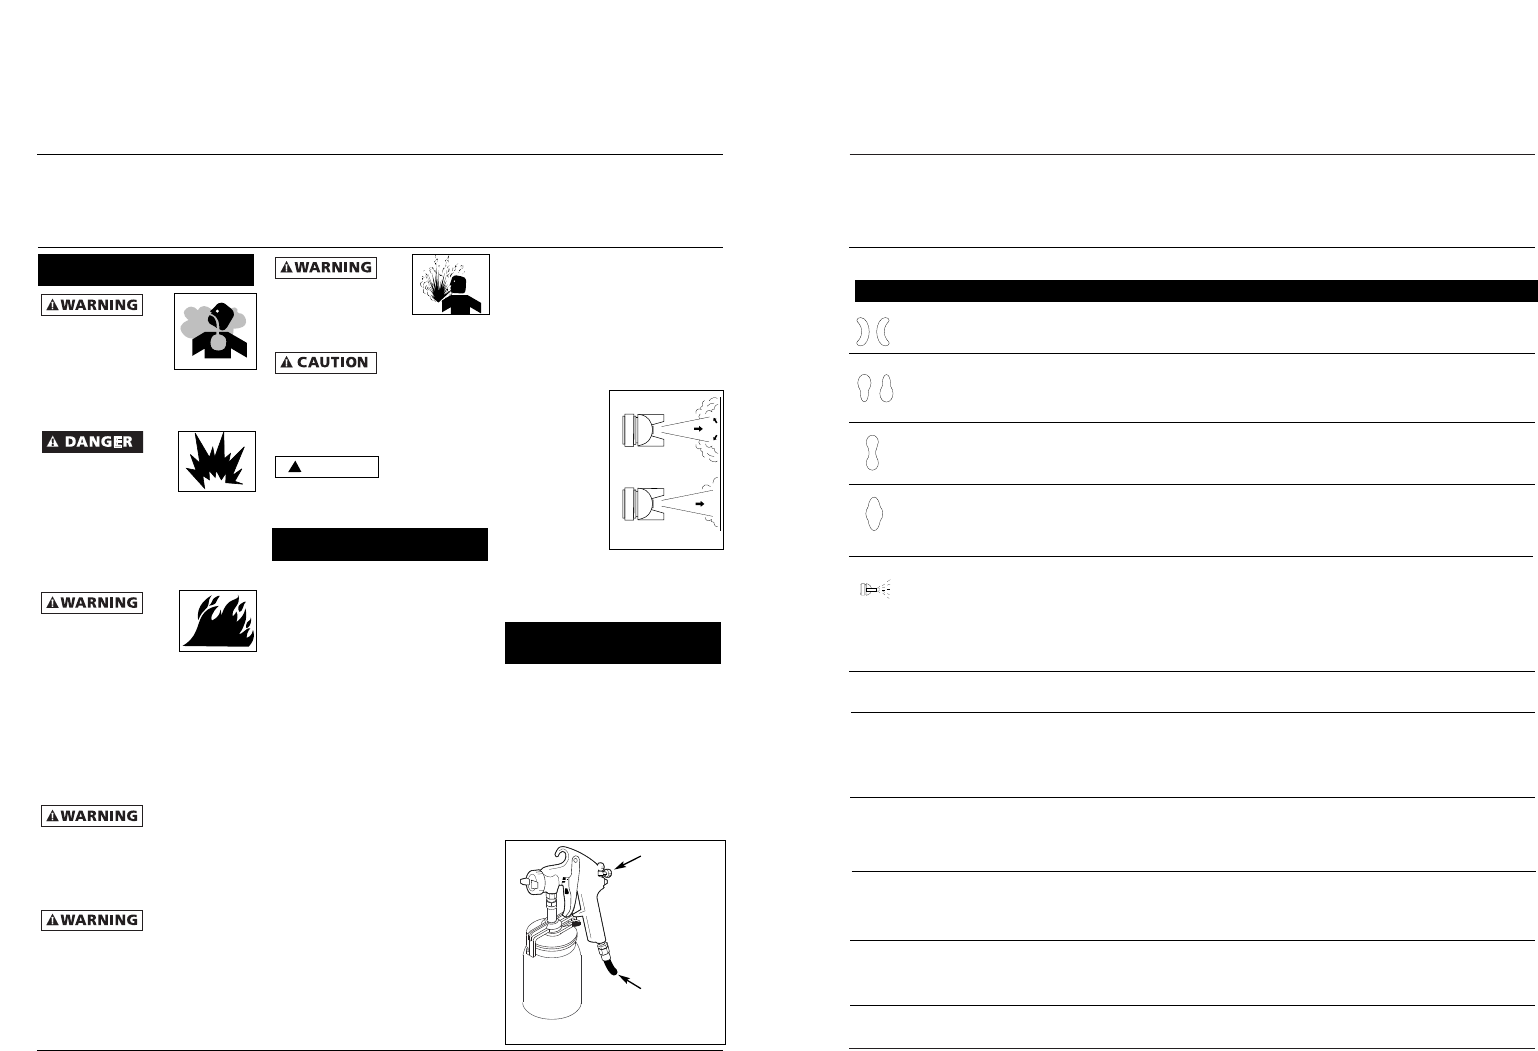
By definition,
dynamic air pres-
sures in the air cap
must be 10 PSI or
less to qualify as
HVLP. A soft, low
velocity pattern is
produced which
increases control and reduces “bounce-
back” and overspray (See Figure 1). For
these reasons, HVLP is also well suited for
spraying parts with recessed areas.
(CONVENTIONAL AND HVLP)
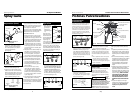
SIPHON FEED CUP SET-UP
The air pressure for atomization is con-
trolled by the regulator on the air
source. The amount of fluid is adjusted
by the fluid control knob, the paint vis-
cosity, and the air pressure (See Figure
2). The siphon cup must be vented to
the atmosphere.
Figure 1
Conventional
HVLP
Figure 2 - Siphon Feed Cup Set-up
Filtered,
Regulated
Air Source
Fluid Control
Knob
Guía de Diagnóstico de Averías
Problema Posible(s) Causa(s) Acción a Tomar
1. Los orificios a los lados de la tapa de
aire están tapados
2. Acumulación de impurezas a los lados
de la boquilla
1. Acumulación de material reseco en la
parte superior o inferior de la boquilla
2. La tapa de aire está floja o el asiento
está sucio
3. La tapa de aire está obstruída
1. El control del patrón está muy abierto
2. El control de fluído está muy bajo
3. Está atomizando demasiado aire
4. La presión es muy baja (sólo en los sis-
temas a presión)
1. El control de rocío está cerrado parcial-
mente
2. El material está muy espeso
3. La presión de atomización es muy baja
4. La presión del fluído es muy alta (en los
sistemas a presión)
1. El nivel de material es muy bajo
2. El envase está muy inclinado
3. La conexión del suministro de fluído
está floja
4. La boquilla o el asiento están flojos o
dañados
5. La tuerca que sostiene el empaque de
la aguja está floja o dañada
6. El orificio de ventilación está obstruído
(sólo en los sistemas de sifón)
1. La tuerca que sostiene el empaque está
floja
2. El empaque está desgastado o seco
1. El vástago de la válvula se atasca
2. La válvula de aire o el asiento están conta-
minados
3. La válvula de aire o el asiento están des-
gastados o dañados
4. El resorte de la válvula de aire está roto
5. El vástago de la válvula está torcido
1. La tuerca que sostiene el empaque está
muy apretada
2. La boquilla está desgastada o dañada
3. La boquilla está sucia
4. El resorte de la aguja está roto
1. La presión de atomización es muy alta
2. La pistola está muy lejos de la superfi-
cie
3. Está pintando incorrectamente (está
moviendo la pistola muy rápido)
1. La pistola no tiene presión
2. El control de fluído está muy cerrado
3. El fluído está muy espeso (sifón)
4. La presión de fluído está muy baja (sis-
temas a presión)
1. El regulador está dañado o defectuoso
2. La válvula de chequeo está obstruída
1. Límpielos. Use sólo pintura no metálica
2. Límpiela
1. Límpiela
2. Límpiela y apriétela
3. Límpiela. Use sólo pintura no metálica
1. Cierre parcialmente el control de fluído
2. Aumente el nivel de fluído
3. Reduzca la presión de atomización
4. Aumente la presión del fluído
1. Ábralo un poco
2. Diluya el material hasta alcanzar la viscosidad adecuada
3. Aumente la presión de atomización
4. Reduzca la presión del fluído o cierre un poco la perilla de
control de fluído
1. Añádale más material
2. Colóquelo más derecho
3. Apriétela
4. Ajústela o reemplácela
5. Lubríquela o apriétela
6. Destápelo
1. Apriétela, pero sin restringir la aguja
2. Reemplácela o lubríquela (con aceite sin silicón)
1. Lubríquelo
2. Límpielos
3. Reemplácela
4. Reemplácela
5. Reemplácela
1. Ajústela
2. Reemplace la boquilla y aguja con un juego de boquilla/aguja
ondeados
3. Límpiela
4. Reemplácela
1. Reduzca la presión
2. Acérquela a la superficie
3. El movimiento debe ser moderado y paralelo a la superficie
1. Chequée las líneas de aire
2. Abra el control de fluído
3. Diluya el fluído o use el sistema a presión
4. Aumente la presión del fluído
1. Reemplace el regulador
2. Limpie o reemplace la válvula de chequeo
www.campbellhausfeld.com
General Safety (Cont.)
Introduction
Types of Spray Gun
Set-Ups