


5 Sp
Manual de Instrucciones
Pistolas Pulverizadores Neumáticas
tiempo y siempre mantenga la pistola en
movimiento mientras esté rociando. Si
para de moverla la pintura se acumulará y
se “chorreará”.
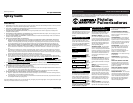
No mueva la pistola de un
lado a otro como un abanico. Este tipo de
movimiento crea depósitos de pintura
que se concentran en el centro del área
cubierta y aplica muy poca pintura en los
bordes (Vea la Figura
12).
2. “Oprima el gatillo” adecuadamente.
Comience a mover la pistola ANTES DE
OPRIMIR EL GATILLO y deje de opri-
mirlo ANTES DE PARAR DE MOVERLA.
Este procedimiento le permitirá que el
acabado sea parejo sin dejar rastros de
donde se unen las diferentes manos de
pintura (Vea la Figura 13).
3. La cantidad de pintura aplicada puede
variar según la velocidad del
movimiento, la distancia entre la pisto-
la y la superficie y los ajustes de la peri-
lla de control de fluído.
4. Los empates entre cada mano deben ser
suficientes para obtener un acabado
parejo al final (Vea la Figura 14).
NOTA: Dos capas poco espesas de pintura
le darán mejores resultados que si aplica
una capa de pintura espesa. Igualmente,
será menos factible que la pintura se chor-
ree.
5. Use un pedazo de cartón como protec-
ción para evitar que la pintura caiga
fuera del área que desea cubrir. Si es
necesario, use cinta pegante (tirro) para
cubrir otras áreas.
LIMPIEZA DIARIA
Los códigos locales tal vez le exijan que
utilice ciertos equipos métodos de
limpieza. Siga los códigos locales y las
recomendaciones del fabricante para el
uso y el desecho de materiales rociados y
solventes.
Limpie la
pistola
pulverizadora inmediatamente después de
terminar de usarla. La pintura y otros
materiales se secan rápidamente dentro de
los ductos pequeños y ésta se dañaría ya
que sería muy dificil de quitarle la pintara
endurecida dentro de dichos ductos.
NOTA: En las siguientes instrucciones, la
palabra “solvente” se refiere al solvente
!
AVISO
Figura 14
adecuado para cada material que haya
usado (por ejemplo: thinner para lacas,
etc).
1. Las pistolas pulverizadoras con envase -
Desconecte el envase y vacíelo, después
enjuáguelo con un solvente recomenda-
do para la pintura o material que haya
usado.
2. Llene el envase de solvente y conéctelo a
la pistola. Rocíe el solvente con la pistola
y agítela con fuerza al mismo tiempo.
Limpie el exterior de la pistola con un
trapo empapado de solvente. Repita
estos pasos hasta que la pistola esté
limpia.
3. Quítele la tapa de aire y remójela en sol-
vente para limpiarla. Use un cepi-llo
pequeño para quitarle las manchas difí-
ciles de sacar. Puede usar palillos o cepil-
los pequeños para limpiar los ductos de
aire; sin embargo, NUNCA USE OBJE-
TOS DE METAL PARA LIMPIAR LOS
DUCTOS QUE HAN SIDO TALADRA-
DOS CON PRECISION. SI ESTOS SE
DAÑAN EL ROCIO SERA INADECUA-
DO.
4. Limpie los empaques con un trapo
empapado en solvente. Para evitar que
el equipo se dañe, No sumerja los
empaques o la pistola en el sol-
vente.
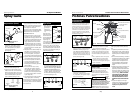
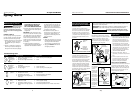
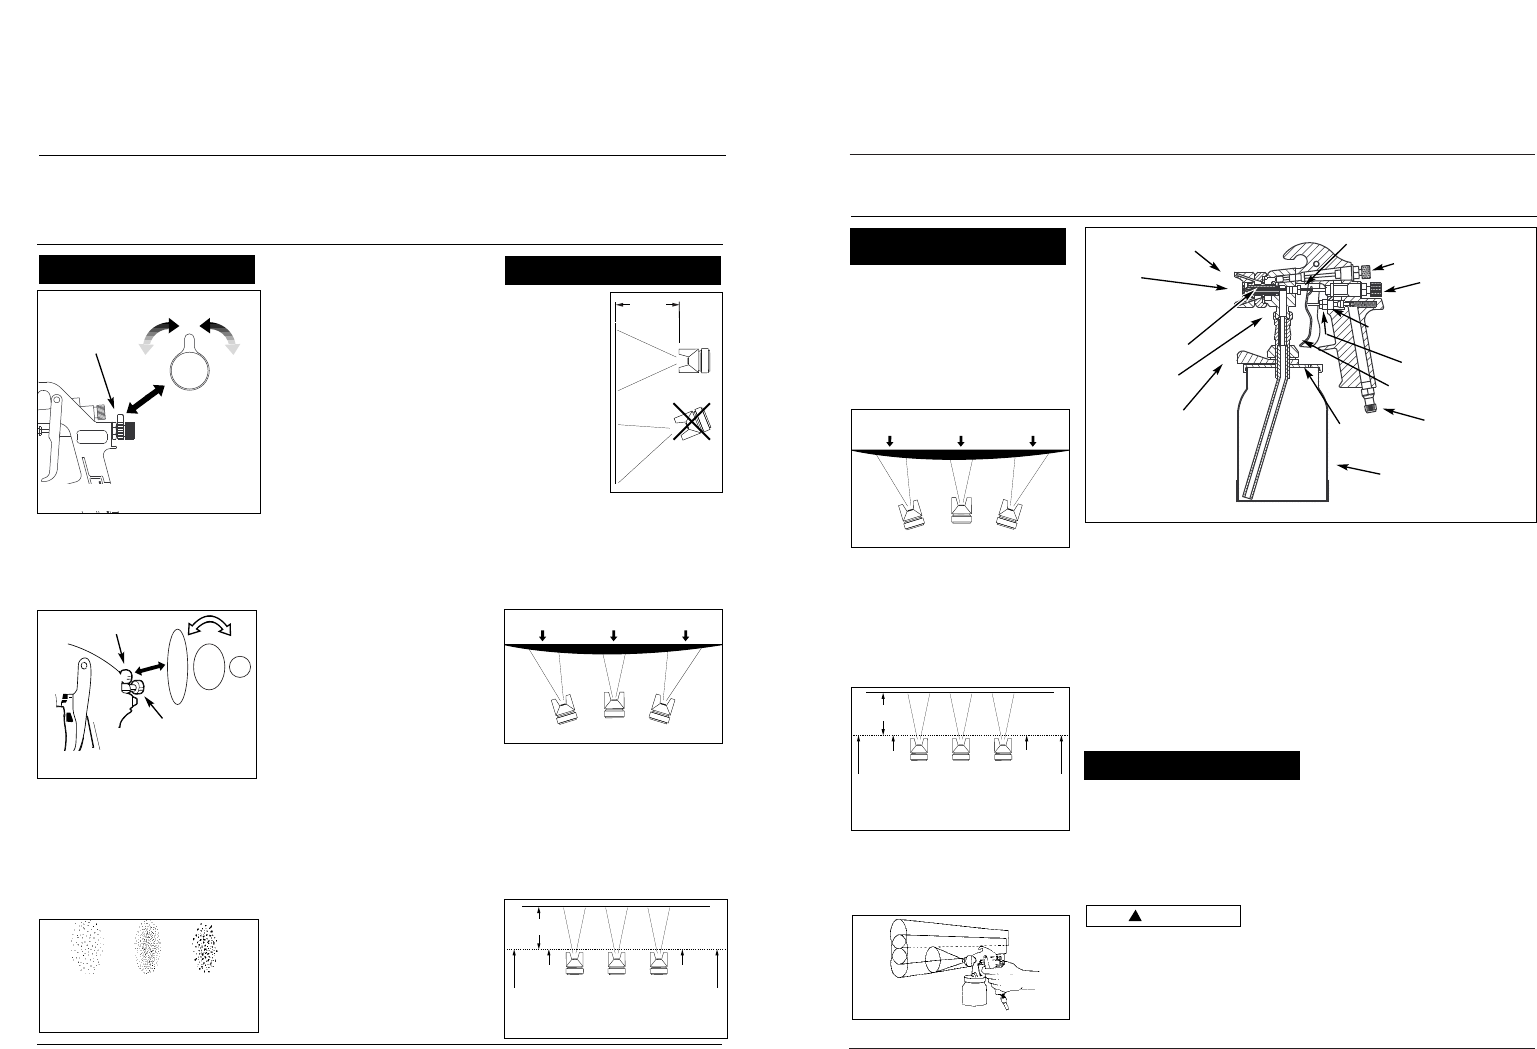
Figura 15 - Pistola Pulverizadora de Sifón
Tapa de
Aire
Boquilla
Aguja de
Fluído
Entrada de Fluído
Abrazadera de
la Tapa del
Envase
Envase
Orificio de
Ventilcación
Conexión de
6,4 mm (1/4”)
NPS (entrada
de aire)
Gatillo
Válvula de Aire
Perilla de Control
de Fluído
Perilla de Control de Patrón
Tuerca (Aguja de Fluído)
Tuerca (Válvula de Aire)
Figura 12
Figura 13
Muy Poca
Pintura
Demasiada
Pintura
INCORRECTO
Muy Poca
Pintura
Oprima
el Gatillo
Comienzo
Suelte el
Gatillo
Final
Pistolas Pulverizadoras
4
Operating Instructions
Air Operated Models
Spray Guns
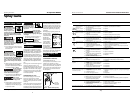
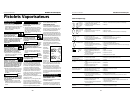
2. Set pattern size to desired shape. For
full pattern, open pattern control
knob by turning counterclockwise.
For a round pattern, turn pattern
control knob clockwise
(See Figure 9).
3. Turn fluid control knob fully clock-
wise until closed (See Figure 9).
4. Trigger a short burst while turning
fluid control knob counterclockwise.
Observe the spray pattern on the tar-
get and adjust the fluid control knob
until the desired pattern (atomiza-
tion) is obtained (See Figure 10).
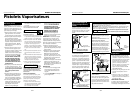
If the spray is too fine (excessive over-
spray), caused by too much air for the
amount of paint being sprayed, reduce
the air pressure or open the fluid con-
trol to spray more material.
If the spray is too coarse (spitting globs),
reduce the amount of material with the
fluid control knob or thin the paint.
PRESSURE FEED SET-UP
1. Adjust air pressure to the spray gun
according to the recommendations
supplied with the spray material. This
air pressure usually falls between 40 -
60 PSI. Adjust air pressure with the
trigger pulled and air control knob
(if applicable) fully open. If reduced
air pressure is desired for some areas
of the spray job, use air control knob
to reduce pressure as necessary (See
Figures 7 or 8).
2. Set pattern size to desired shape. For
full pattern, open pattern control
knob by turning counterclockwise.
For a round pattern, turn pattern
control knob clockwise (See Figure 9).
3. Open the fluid control knob by turning
counterclockwise about three turns.
4. Start the tank pressure at 0 PSI and
turn the tank regulator slowly to
increase fluid delivery until the
desired pattern consistency (atomiza-
tion) is reached.
5. If the atomization is too coarse,
reduce the tank pressure with the
tank regulator. Trigger a short burst
or open relief valve to relieve the
pressure, then increase pressure slow-
ly to obtain proper pattern consisten-
cy (See Figure 10).
6. The fluid control knob can be used to
finely adjust pattern consistency.
Before spraying the workpiece, practice
a few minutes on a cardboard target to
ensure the pattern size and consistency
are set correctly.
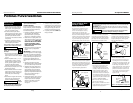
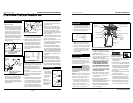
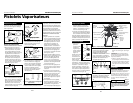
1. Begin spraying.
Always keep the
gun at right
angles to the
work (See Figure
11).
Keep the nozzle
about 6 to 9 inches
from the work sur-
face throughout the
stroke and always
keep the gun in
motion while spray-
ing. Stopping gun movement in mid-
stroke will cause a build up of paint and
result in “runs.” Do not “fan” the gun
from side to side while painting. This will
cause a build-up of paint in the center of
the stroke and an insufficient coating at
each end (See Figure 12).
2. “Trigger” the gun properly. Start the
gun moving at the beginning of the
stroke BEFORE SQUEEZING THE TRIG-
GER and release the trigger BEFORE
STOPPING GUN MOVEMENT at the
end of the stroke. This procedure will
“feather” (blend) each stroke with
the next without showing overlap or
unevenness (See Figure 13).
Figure 9 - Pattern Size
Pattern control knob
Fluid control
knob
Correct
Paint too
coarse
Paint too
fine
Figure 10 -Pattern Consistency
(Atomization)
6 - 9”
Figure 11
Thin coat Thin coat
Heavy coat
Figure 12
INCORRECT
P
EEDAIRE
Increase
Air Flow
Decrease
Air Flow
Figure 8 - Air Adjustment on
Spray Gun
Air Control
Knob
6 - 9”
Pull
Trigger
Start
Stroke
Release
Trigger
End
Stroke
Figure 13
15-23cm
www.campbellhausfeld.com
Preparation (Cont.)
Operation
Functionamiento
(Continuación)
Mantenimiento