


3
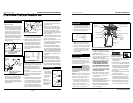
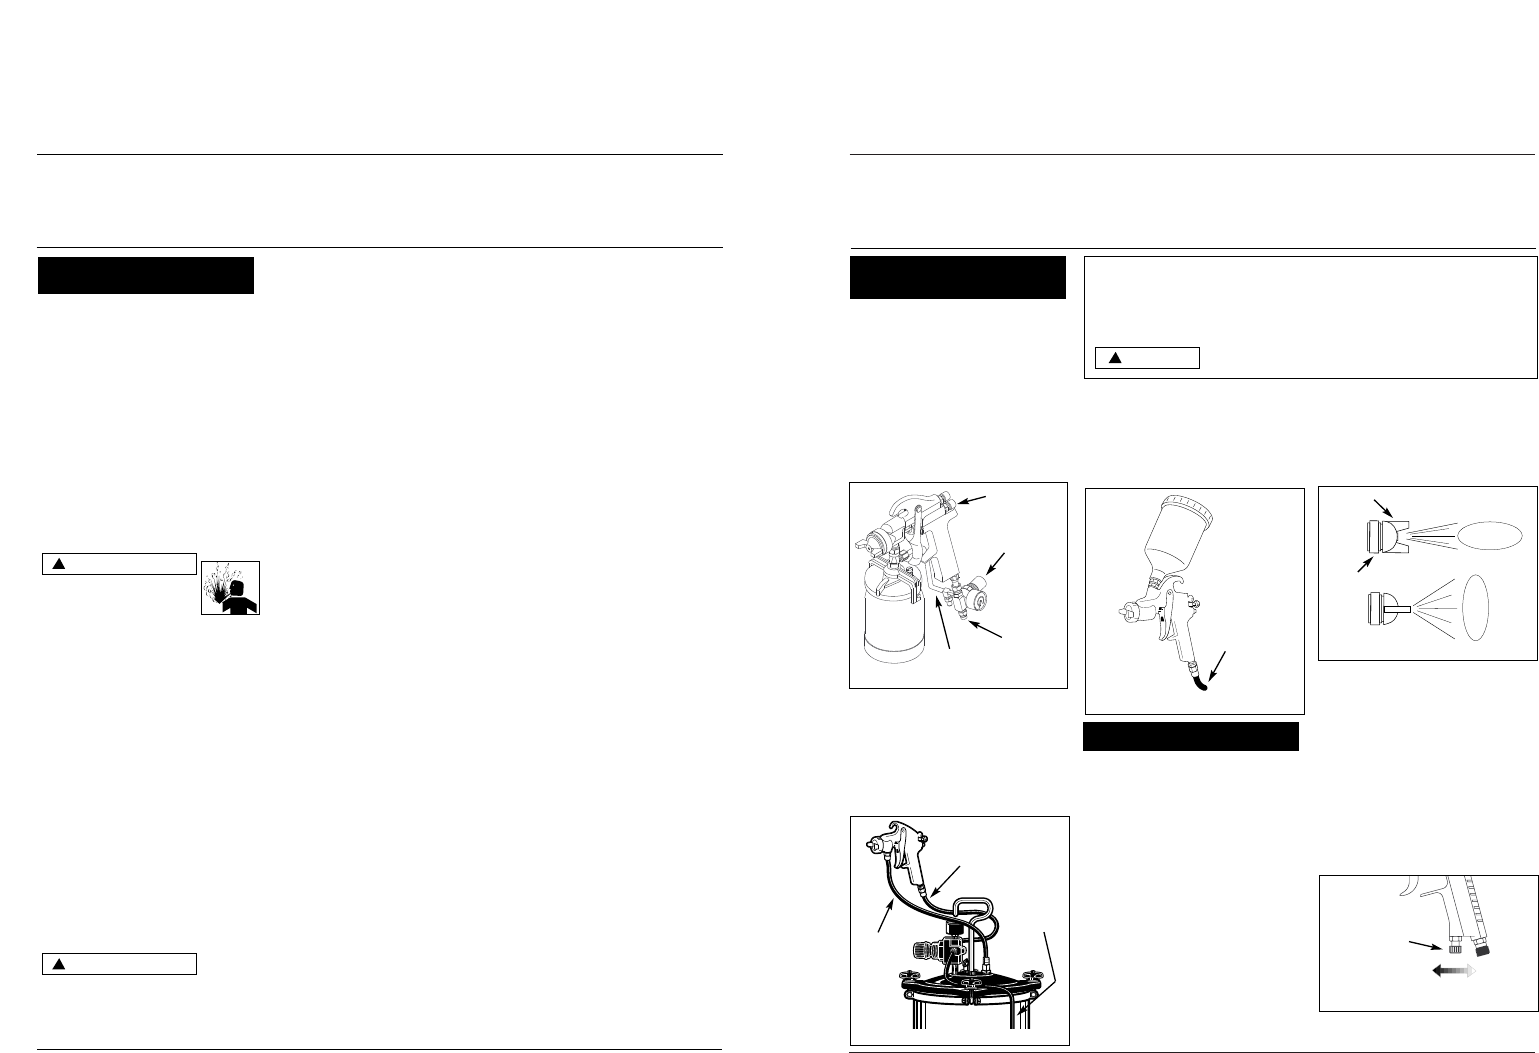
PRESSURE FEED CUP SET-UP
Air pressure for atomization is con-
trolled by the regulator on the air
source. The fluid pressure is set by
adjusting the cup regulator. The
amount of fluid is also adjusted by the
fluid control knob (See Figure 3). This
method is required for heavy fluids and
when using internal mix nozzle spray-
ing. This method generally requires a
special fluid tip, needle and air cap set.
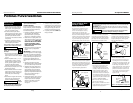
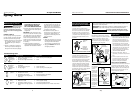
PRESSURE FEED TANK SET-UP
This method is the same as the pressure
feed cup set-up except that the gun can
be oriented in any position independent
of the tank (See Figure 4). This method
is useful for medium production or
large scale spraying applications.
GRAVITY FEED CUP SET-UP
This method is similar to the siphon
feed with cup except that the cup is
positioned above the spray gun body
(See Figure 5). This creates a positive
fluid pressure in the fluid nozzle.
1. Thoroughly mix the paint in accor-
dance with the manufacturer’s
instructions, adding thinner where
necessary. Most materials will spray
readily if thinned properly. Strain
material through cheese cloth or a
paint strainer. Test the consistency of
the material by making a few strokes
on a cardboard target. If material still
appears too thick, add a small amount
of thinner. THIN WITH CARE!!
2. Fill the canister about 3/4 full and
start the air compressor.
3. Set up a piece of cardboard or other
scrap material to use as a target and
adjust for best spray pattern.
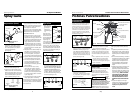
FAN DIRECTION
The direction of the fan (horizontal or
vertical) can be changed by loosening
the lock ring and turning the air cap 90
degrees (See Figure 6). Hand tighten
lock ring after adjustment.
PATTERN ADJUSTMENT
SIPHON AND GRAVITY FEED
1. Adjust air pressure to the spray gun
according to the recommendations
supplied with the spray material. This
air pressure usually falls between 40 -
60 PSI. Adjust air pressure with the
trigger pulled and air control knob (if
applicable) fully open. If reduced air
pressure is desired for some areas of
the spray job, use air control knob to
reduce pressure as necessary (See
Figures 7 or 8).
WATER/OIL IN COMPRESSED AIR
All compressor pumps discharge some condensed water, oil or contaminates with
the compressed air.
IMPORTANT: This condensation will cause “fish eyes” to appear in the paint
job. Install appropriate water/oil removal equipment and controls as necessary
for the intended application.
Failure to install appropriate water/oil removal equipment
may result in damage to machinery or workpiece.
!
NOTICE
Figure 4 - Pressure Feed Tank Set-up
Air to Spray Gun
Filtered,
Regulated
Air Source
Pressure Tank
Fluid
Hose
Figure 5 - Gravity Feed Cup Set-up
Filtered,
Regulated
Air Source
Figure 6
Horizontal Fan
Vertical Fan
Air Cap
Lock Ring
Figure 7 - Air Adjustment on Spray Gun
Increase
Air Flow
Decrease
Air Flow
Air Control
Knob
6 Sp
Manual de Instrucciones
Pistolas Pulverizadores Neumáticas
Pistolas Pulverizadoras
5. Después de usar agua para limpiar la
pistola cuando haya usado pinturas a
base de agua, rocíe aguarrás para
evitar que la pistola se oxide.
6. Use aceite sin silicón para lubricar
todas las piezas que se mueven antes-
de ensamblar la pistola. Use Vaselina o
grasa liviana para lubricar todas las
conexiones con roscas antes de almace-
nar la pistola.
7. Limpie bien la pistola para eliminar
todos los contaminantes que podrían
oxidar la pistola pulverizadora.
PARA LIMPIAR LA PISTOLA DESPUES DE
USARLA CON UN TANQUE DE PINTURA
Cierre el suministro de aire al
tanque y libere toda la presión
del tanque.
1. Abra el orificio de ventilación del
tanque de pintura. Si está usando una
tapa de aire de mezcla externa, aflójela
un poco.
2. Reduzca la presión de aire a ,7 - 1,4
bar. Enrróllese un trapo en la mano,
cúbrale con éste los orificios a la tapa
de aire y oprima el gatillo. El aire se
regresará a través de la boquilla
forzando a la pintura hacia el tanque.
3. Vacíe el tanque y límpielo con un trapo
empapado en solvente.
4. Vierta suficiente solvente en el tanque
para limpiar a fondo la manguera y la
pistola. Cierre el tanque y comience a
rociar hasta que el solvente salga
limpio.
5. Desconecte la manguera de material y
séquela con aire comprimido para
sacarle los residuos de solvente.
Cuando
le aplique
aire comprimido a la manguera, para
secarla, cerciórese de mantenerla alejada
de cualquier persona para evitar que le
!
ADVERTENCIA
!
ADVERTENCIA
caigan residuos de solvente en los ojos y
la piel ocasionandole heridas.
LIMPIEZA PERIODICA
De vez en cuando deberá inspeccionar y
limpiar el interior y exterior de la pistola
para quitarle los residuos de pintura y
acumulaciones de polvo.
1. Examine los orificios de la tapa de aire
y la boquilla. Si están obstruídos,
quítele los anillos en O y sumerja la
tapa de aire o la boquilla en solvente.
2. Puede utilizar un cepillo, palillo u otro
objeto similar para sacar la pintura seca
de los orificios o ductos. NUNCA USE
OBJETOS DE METAL PARA LIMPIAR
DUCTOS TALADRADOS A PRESI-
CION. SI ESTOS SE DAÑAN PODRIA
AFECTAR EL ROCIO.
3. Desconecte y revise la aguja de ajuste
para ver si está muy desgastada o
torcida.
IMPORTANTE: Si el extremo de la aguja
está más desgastado en un lado, la aguja
está torcida o la pistola está desaliniada
debido a un golpe o una caida. Si la pisto-
la está torcida no podrá repararla. Para
probar la aguja, deslícela sobre una
superficie plana. Reemplácela si es nece-
sario.
4. Chequée y reemplace los anillos y
sellos dañados. Éstos se pueden limpiar
pero no los debe sumerjir en solvente.
5. Sáquele las tuercas que sostienen los
empaques y reemplácelos SOLO si no
puede eliminar la fuga de material
después de apretar las tuercas (Vea la
Figura 15). No apriete demasiado estas
tuercas ya que podría restringir el
movimiento de la aguja.
6. Ensamble las piezas en orden contrario
a lo anterior y use aceite sin silicón en
las piezas que se mueven. Aplíquele
Vaselina o grasa liviana a las conex-
iones con roscas y a las de las
mangueras.
PARA ALMACENAR
1. Cuando no vaya a usar la pistola
pulverizadora, gire la perilla de con-
trol de fluído en sentido contrario a
las agujas del reloj para reducir la
tensión del resorte sobre la aguja.
2. La pistola pulverizadora DEBEestar
limpia y lubricada.
Operating Instructions Air Operated Models
Figure 3 - Pressure Feed Cup Set-up
Fluid Pressure
Regulator
Filtered,
Regulated
Air Source
Fluid Control
Knob
Cup Pressure Hose
www.campbellhausfeld.com
Types of Spray Gun
Set Ups (Cont.)
Preparation
Mantenimiento
(Continuación