


3
Operating Instructions and Parts Manual
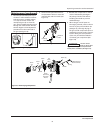
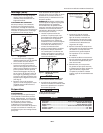
6. Install the appropriate needle/nozzle
assembly se lect ed for the material to
be sprayed (Fig. 2, 3 & 4 ).
7. Reassemble the needle assembly,
spring, ma te ri al con trol knob,
nozzle, air cap, and retainer ring.
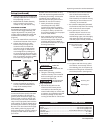
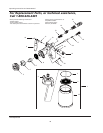
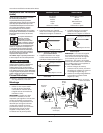
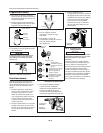
ADJUSTING PACKING
Occasionally the packing nut, located
forward of the trigger as sem bly, will
require adjustment. The pack ing nut
will also require adjustment when the
needle/nozzle assembly is changed
(Figure 6).
1. Turn the material flow control knob
clockwise at least 3/4 of the way in.
2. Tighten the packing nut with
the wrench by turning the nut
clockwise until the needle will
not return to the closed position
when the trigger is released. Do
not overtighten the packing nut.
To properly adjust the packing, the
nut should be tightened no further
than is required to stop the needle
from returning. (See Figure 6).
Figure 6 - Adjusting The Packing Nut
3. Loosen the packing nut (approx.
1/4 turn) until the needle returns
freely to the closed position.
Preparation
PREPARING TO SPRAY
Some manufacturers specify that their
ma te ri als should not be thinned. In
general, these in struc tions apply only
when a brush or roller is used. It may
be necessary to thin these materials if
they are to be sprayed. Check with the
paint supplier for specific details when
pur chas ing the material to be sprayed.
Be sure to stir the material thoroughly
after adding a thinning agent, and
before checking the vis cos i ty. Fail ure to
properly mix the material results in a
poor finish.
NOTICE: Some latex finishes are very
thick and require the greatest amount
of thinning and mixing. A latex paint
conditioner can be added to the
paint to improve spray performance
(available at most home centers).
1. Strain paint before spraying.
Unstrained paint may affect
material flow and spray pattern.
When spray ing thin materials such
as lacquer or stains, consult with
the material supplier for the proper
strainer mesh number.
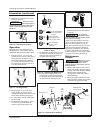
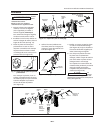
2. Pour material into the paint cup.
Fill the material cup only 1/2 to 3/4
full if thinning of the material is
required. (See Figure 7). Refer to
the material chart below for proper
thinning instructions.
Figure 7 - Filling The Paint Cup
Follow the
NOTICE
material
manufacturer’s rec om men da tion for the
proper thinning solvent.
3. Using the following procedure,
check the vis cos i ty of the material
before locking the gun onto the
material cup (Figure 8).
The viscosity stick
NOTICE
is located in the
storage compartment.
a. Dip the viscosity stick into the
material. As the viscosity stick is
removed from the material, the
material will initially run off the stick
as a stream. The material stream will
break up and begin to drip after
running off the stick for a short time.
b. Estimate the time interval be tween
each of the first three drips of
material. The time between the
first three drips of material will vary
de pend ing on the thickness or the
“viscosity” of the material.
c. The material is adequately thinned if
the first three drips from the viscosity
stick are about one second apart.
d. As a general rule, if the time
between drips is more than one
second, the material is too thick.
Add thinning agent, stir thoroughly
and repeat the above pro ce dure
until the proper viscosity is attained.
Figure 8 - Viscosity Stick
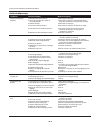
4. To tighten and lock the cup, place
the retainer arms securely around
the retaining pins on the paint cup.
5. Move the locking lever clockwise to
the locked po si tion. (See Figure 9).
Figure 9 - Locking The Cup
Acrylics .............................................................. Follow Manufacturer’s Instructions
Stains ......................................................................................No Thinning Required
Clear Sealers ...........................................................................No Thinning Required
Lacquers ........................................................... Follow Manufacturer’s In struc tions
Oil-Base Paint ...............................................................................................10 - 40%
Latex Paints ..................................................................................................15 - 20%
MATERIAL PERCENT REDUCED
Viscosity Stick (Located
Inside The Storage
Compartment)
Material Flow
Control Knob
Packing
Nut
Tighten
Locking Lever
Retaining Pin
Retaining Arm
Setup (continued)
www.chpower.com