


6
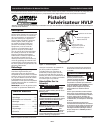
Operating Instructions and Parts Manual
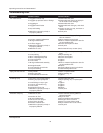
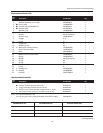
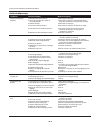
No material flow
Slow material flow
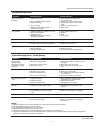
Material leak
Spray will not shut off
Pulsating spray
Excessive overspray
1. Dis as sem ble and clean
2. Dis as sem ble and clean (a straight pin
can be used to clean fittings)
3. Dis as sem ble and clean
4. Disassemble and clean gun, and check
valve
5. Inspect cup seal, cup cap, and clean or
replace as nec es sary
6. Strain paint
1. Clear ma te ri al tube, gun, fittings, and
thin the material
2. Adjust ma te ri al control knob
3. Refer to ma te ri al ap pli ca tion chart for
correct nee dle/nozzle
4. Re move and replace air filter
5. Strain paint
6. Raise material temp. to 60°F (15°C)
1. Check cup gun and replace dam aged
parts
2. Adjust pack ing nut
3. Re move and replace
4. Re move and replace
5. Tighten
6. Tighten
7. Refer to ma te ri al ap pli ca tion chart for
correct needle/nozzle
8. Re place
9. Properly ad just by turning clock wise
10. Clean and dry before use
1. Clean or re place needle
2. Adjust pack ing nut
3. Tighten
1. Dis as sem ble and clean
2. Adjust pack ing nut, or replace pack-
ing
3. Tighten
4. Tighten
5. Tighten
6. Re place
7. Strain paint
1. Check ma te ri al viscosity (add non-
thinned material)
2. Adjust air flow
3. Wrong nee dle/nozzle assembly
4. Move gun clos er to surface
5. Move to an area without wind
6. Adjust ma te ri al flow control knob
7. Strain paint
1. Clogged noz
zle/air cap
2. Clogged cup pressure tube or fit tings
3. Clogged gun
4. Clogged ma te ri al tube
5. Cup seal leaking
6. Material not properly mixed, or
im prop er ly filtered
1. Material too thick
2. Improper ma te ri al ad just ment
3. Wrong nee dle/nozzle
4. Air filter clogged
5. Material not properly mixed, or
im prop er ly fil tered
6. Material too cold
1. Cup or gun damaged
2. Loose pack ing
3. Worn or dam aged packing
4. Worn or dam aged cup seal
5. Loose cup fit tings
6. Loose noz zle
7. Wrong nee dle/nozzle assembly
8. Dam aged nee dle
9. Loose ma te ri al control knob
10. Cup seal leaking
1. Dirty needle
2. Packing too tight
3. Loose ma te ri al control knob
1. Cup seal or check valve leaking
2. Packing im prop er ly adjusted
3. Loose fit tings on cup or gun
4. Loose air cap retainer ring
5. Loose noz zle
6. Dam aged air flow ring
7. Material not properly mixed, or
im prop er ly filtered
1. Material too thin
2. Ex ces sive air flow
3. Wrong nee dle/nozzle
4. Gun too far from project
5. Spray blown by wind
6. Ex ces sive material flow
7. Material not properly mixed, or
im prop er ly filtered
Troubleshooting Chart
Symptom Possible Cause(s) Corrective Action
www.chpower.com