


SKU 95173 For technical questions, please call 1-800-444-3353 PAGE 5
ASSEMBLY INSTRUCTIONS
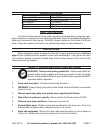
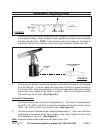
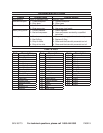
REGULATOR
FIGURE A
FILTER
OILER
For best service, you should incorporate an oiler, regulator, and in-line filter, as shown
in the diagram above. Hoses, couplers, oilers, regulators, and filters are all available
at Harbor Freight Tools. NOTE: If an automatic oiler is not used, put 3-5 drops of
pneumatic Tool Oil (not included) in the tool’s quick connector before each use.
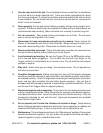
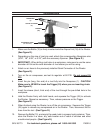
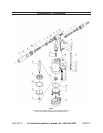
FIGURE B
QUICK CONNECTOR
(NOT INCLUDED)
AIR INLET
(35)
Prior to use, the Riveter requires the attachment of a Quick Connector (not included)
to its Air Inlet (35). To do so, make sure the screen Air Filter is properly seated in
the Air Inlet (35). Wrap approximately 3” of pipe thread sealer tape (not included)
around the male threads of the Quick Connector. Then, firmly tighten the Quick
Connector into the Air Inlet. (See Figure B.)
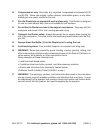
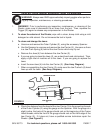
To Install A Nosepiece:
The Riveter comes with a set of four Nosepieces (1). The sizes of the Nosepieces
are 3/32”, 1/8”, 5/32”, and 3/16” and must be matched with the size of the rivet pin
(3/32”, 1/8”, 5/32”, or 3/16”) you intend to use. (See Figure D.)
Use the accessory Spanner when changing Nosepieces (1). Also, use care when
unscrewing a Nosepiece as the spring action in the Outer Cylinder (2) will cause
the Nosepiece to “pop out”. (See Figure D.)
Note: Nosepieces are stored underneath the Base Cover (34).
1.
2.
1.
2.