


Page 14 For technical questions, please call 1-800-444-3353. SKU 98265
MAINTENANCE AND
SERVICING
Procedures not specically explained
in this manual must be performed
only by a qualied technician.
TO PREVENT SERIOUS
INJURY FROM
ACCIDENTAL
OPERATION:
Turn the Power Switch of the tool to
its “OFF” position and unplug the
tool from its electrical outlet before
performing any inspection,
maintenance, or cleaning
procedures.
TO PREVENT SERIOUS INJURY
FROM TOOL FAILURE:
Do not use damaged equipment. If
abnormal noise or vibration occurs,
have the problem corrected before
further use.
Cleaning, Maintenance, and
Lubrication
1. BEFORE EACH USE, inspect the gen-
eral condition of the tool. Check for
loose screws, misalignment or binding of
moving parts, cracked or broken parts,
damaged electrical wiring, loose or worn
out blade, and any other condition that
may affect its safe operation.
2. AFTER USE, clean external surfaces
of the tool with clean cloth. Drain water
from the water tray and wash out any
residue from the sump pump.
3. Tool service must be performed only
by qualied repair personnel. Service
or maintenance performed by unqualied
personnel could result in a risk of injury.
4. When servicing a tool, use only
identical replacement parts. Follow
instructions in the “Inspection,
Maintenance, And Cleaning” section
of this manual. Use of unauthorized
parts or failure to follow maintenance
instructions may create a risk of electric
shock or injury.
5. WARNING! If the supply cord of
this power tool is damaged, it must be
replaced only by a qualied service
technician.
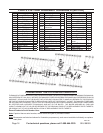
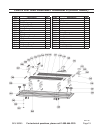
Changing the Blade
1. Disconnect the power supply. Have the
Tile Saw in front of you so that you are
facing the saw blade and the clear plas-
tic Cover (A27)
2. The blade assembly must be at the open
end of the water tray to the right of where
the Worktables end (D06).
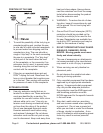
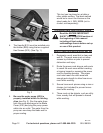
3.
Fig. 5
Remove the three Hex Screws (A28)
holding the clear Cover to the Blade
Cover. (See Fig. 5.)
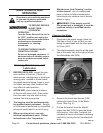
4. Put the at wrench over the blade’s
larger Hex Bolt (A32) to keep the blade
from turning. Use a hex T-wrench (not
included) to remove the blade’s retaining
hex bolt by turning the bolt counterclock-
wise.
REV 10b