


User’s Manual
December 2005 Page 9
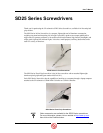
Installing the Screwdriver
Use the following procedure to install SD25 Series screwdrivers to the CS2000 Mini Controller.
Installing the Screwdriver
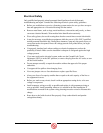
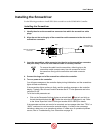
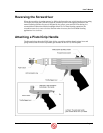
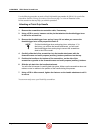
1. Identify the slot on the screwdriver connector into which the screwdriver cable
plugs.
2. Align the red dot on the grip of the screwdriver cable connector to the slot on the
screwdriver connector.
3. Insert the screwdriver cable connector into the slot on the screwdriver connector
and push firmly. There is a click when the cable is correctly inserted.
NOTE:
??
??
To remove the cable from the screwdriver, slide the grip on the
screwdriver cable connector away from the screwdriver and at
the same time firmly pull the screwdriver and cable connector
apart.
4. Connect the large end of the screwdriver cable to the controller.
5. Turn on power to the controller.
You will see messages on the controller display during initialization, and the screwdriver
lights will flash momentarily.
If the screwdriver lights continue to flash, read the scrolling message on the controller
display. Typically, this will read “Invalid Parameter Set X.” Fix the parameter set in the
controller via VS.
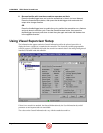
To fix the invalid parameter set:
• Click on the Parameter Set that displays a red and black
next to it and click on
the tab that also displays the
. Correct the value that is highlighted in red. Refer
to the Visual Supervisor User’s Guide (part number 39-30-34823) for details.
If the parameter set does not need to be corrected, and a message other than “TRQ=” or
“ANG=” continues to scroll across the controller display, it is likely to be a message
indicating a data error or an operational problem. If a data error or operational problem
occurs, refer to Troubleshooting Your Screwdriver on page 19.
Grip
Red dot
Slot into screwdriver
connector
Screwdriver-to-
controller cable