


18 19
18 19
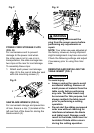
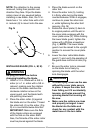
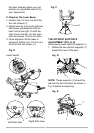
THREE POSITION ROTATING
HANDLE (FIG. E)
The handle of the miter saw has been
designed to rotate and lock at three
different position stops; 45
0
left, 0
0
, and
45
0
right for operator convenience. To
rotate the handle:
1. Unlock the handle locking lever (1)
by pulling it toward the front of the
machine.
2. Pull the handle-locking latch (2)
to the front of the saw and hold in
position.
3. Rotate the handle to the desired
position stop and release the
handle-locking latch. NOTE: After
releasing the handle-locking latch,
rotate the handle left and right to
make sure the latch engages into
the positive locking position.
4. Lock the handle locking lever (2) by
pushing it IN toward the rear of the
handle.
Fig. E
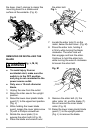
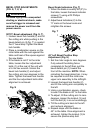
INSTALLING THE SAFETY HOLD-
DOWN CLAMP (FIG. F)
1. Place the hold-down clamp
assembly (1) in one of the mounting
holes (2), located behind the fence.
2. Thread the hold-down clamp knobs
(3) into the holes (2) located at the
rear of the saw base.
3. Tighten the hold-down clamp knobs
(3).
2
1
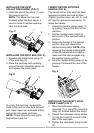
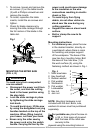
INSTALLING THE DUST
COLLECTION ELBOW (FIG. C)
1. Install the end of the elbow (1) onto
the exhaust port (2).
NOTE: The elbow can be used
to attach either the dust bag or a
vacuum hose to remove sawdust
from the work area.
Fig. C
INSTALLING THE DUST BAG (FIG. D)
1. Squeeze the metal collar wings (1)
of the dust bag (2).
2. Place the dust bag neck opening
around the dust collection elbow (3),
and release the metal collar.
Fig. D
To empty the dust bag, squeeze the
metal collar and remove from exhaust
port. Open zipper on underside of bag
and empty into waste container.
NOTE: Check frequently and empty
bag before it gets full.
2
1
2
3
1