


12 13
12 13
WARNING
!
ASSEMBLY AND ADJUSTMENTS
ASSEMBLY INSTRUCTIONS
To avoid injury, do not connect this miter
saw to the power source until it is completely
assembled and adjusted and you have read
and understood this Operator’s Manual.
ASSEMBLE STAND (FIG. A-1, A-2, A-3)
1. Unpack all parts and group by type and size.
Refer to parts list on page 9 for quantities.
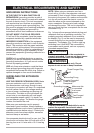
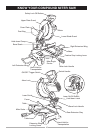
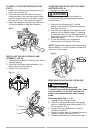
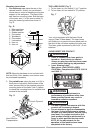
2 Identify the two long-upper supports: (7) &
(8), in which the distance between 2 bolt
holes of front upper support (7) are shorter
than the one of rear upper support (8). (Fig. A-1)
Fig. A-1
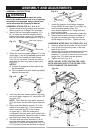
3. Attach the front long-upper support (7) to two
upper legs (1) by using caphead square neck
bolt (10) for the outside and tooth flange
nuts (13) for the inside. Repeat this step to
assemble the rear long-upper support part.
(Fig. A-2)
NOTES:
a) Position all supports to the inside of the
leg assemblies.
b) Do not tighten bolts until stand is properly
aligned (see step #9).
Fig. A-2
4 Joint front and rear frames sections by using
two short-upper supports (4), using bolts (10)
and nuts (13).
NOTE: Place both the long-upper supports
(7) & (8) above the two short-upper supports
(4).
5 Attach one short-bottom support (3) to the
inside of one upper leg (1), and meantime
attach one lower leg (2) to the outside
of upper leg (1). With this three parts
overlapped, use bolts and nuts to attach the
stand leg assemble. Repeat the step to finish
the other three stand leg constructions.
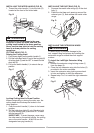
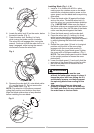
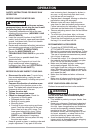
6 The front and rear lower brackets (5) & (6)
must be assembled using caphead square
neck bolt (10) and tooth flange nuts (13).(Fig.
A-3) Connect on both top and side of support.
7 Attach the conjunct long-bottom supports
to the INSIDE of lower legs (2), and both its
ends should be placed under the
short-bottom supports (3). Using bolts and
nuts to attach them.
8. Place one foot pad (9) on the bottom of each leg.
9. Place stand on level surface and adjust, so
all legs are contacting the floor and are at
similar angles to the floor. Tighten all nuts.
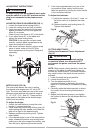
ASSEMBLE MITER SAW TO STAND (FIG. A-4)
1. Carefully place the miter saw on top of stand.
2. Line up the four mounting holes in the saw
base to the stand.
3. Fasten the saw to the assembled stand using
the four hex head bolts (12) and four flat
washers (11) on top of the saw and four tooth
flange nuts (13) under the saw bracket.
4. Tighten all nuts. (Fig. A-4)
NOTE: DO NOT OVER TIGHTEN THE LOCK
NUTS HOLDING SAW TO THE STAND. THIS
COULD DAMAGE THE SAW BASE.
Fig. A-4
10
10
13
13
7
1
1
Fig. A-3
6
5
10
13
10
11
FRONT
Front upper support
Rear upper support
Bolt holes