


22 23
22 23
Fig. W
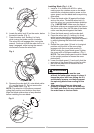
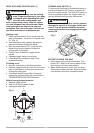
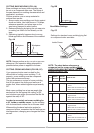
BEVEL CUT (FIG. X)
1. When a bevel cut is required, loosen the bevel
lock handle (1).
2. Tilt the cutting head to the desired angle as
shown on the bevel scale (2). The blade can
be positioned at any angle, from a 90° straight
cut (0° on the scale) to a 45° left bevel.
3. Tighten the bevel lock handle (1) to lock the
cutting head in position.
4. Positive stops are provided at 0° and 45°.
Fig. X
1
2
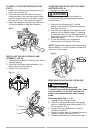
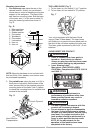
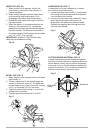
MITER CUT (FIG. W)
1. When a miter cut is required, unlock the
miter table by turning the miter handle (1)
counterclockwise.
2. While holding the miter handle, press down
on the positive stop locking lever (2) to
disengage the positive stop locking lever.
3. Rotate the miter table to the right or left with
the miter handle.
4. When the table is in the desired position as
shown on the miter scale (3), release the
positive stop locking lever handle and tighten
the miter handle. The table is now locked at
the desired angle. Positive stops are provided
at 0°,15°, 22.5°, 31.6° and 45°.
IMPORTANT: ALWAYS TIGHTEN the miter
table lock handle before cutting.
3
1
2
3
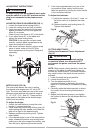
COMPOUND CUT (FIG. Y)
A compound cut is the combination of a miter
and a bevel cut simultaneously.
1. Loosen the bevel lock handle (1) and position
the cutting head at the desired bevel position.
Lock the bevel lock handle.
2. Loosen the miter table lock handle (2). Press
down the positive stop locking lever (3)
and position the table at the desired angle.
Release the positive stop locking lever and
lock the miter handle.
Fig. Y
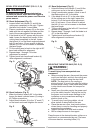
CUTTING BOWED MATERIAL (FIG. Z)
A bowed workpiece must be positioned against
the fence and secured with a clamping device as
shown before cutting. Do not position workpiece
incorrectly or try to cut the workpiece without the
support of the fence. This will cause the blade to
bind and could result in personal injury.
Fig. Z
1
2
Hold-Down
Clamp
Workpiece