


14
OPERATION cont.
GENERAL CUTTING
1. Adjust planer to desired depth.
2. ALWAYS grip the planer with your left-hand holding the front handle and your right
hand holding the rear handle.
3. Place front shoe flat on the work piece. ALWAYS make sure that the blades are not
touching the work piece.
4. Apply pressure to the front handle until the front shoe is flat on the work piece.
5. Push the On/Off button and Squeeze the trigger switch to start the planer and allow the
motor to reach maximum speed.
6. Hold the planer firmly and push it steadily in a forward direction onto the work piece.
NOTE: If you desire a smooth cut, push the planer slowly in a forward direction.
7. As you reach the end of your desired cut, ALWAYS apply downward pressure toward
the rear handle. This will help keep the rear section of the base in contact with the work
piece and help prevent the front of the planer from dipping and gouging your cut.
8. ALWAYS be careful to avoid hitting nails during the planing operation because this
could nick, crack or otherwise damage the blades.
NOTE: The blades in your planer are reversible, so they can be rotated until both
sides are dull.
NOTE: We suggest that you keep an extra set of blades on hand, so you can replace the
blades in your planer when they show signs of becoming dull. Always reverse or replace
blades in pairs.
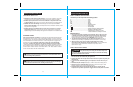
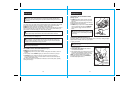
EDGE PLANING / CHAMFERING (See Figure 4)
Your planer is designed with a groove in the front shoe. This groove is for chamfering the
edges of boards (see Fig. 4).
NOTE: ALWAYS make a practice cut on scrap wood to determine how much wood needs
to be removed from the board BEFORE making your actual cut.
1. Firmly hold the rear handle of the planer with
your right hand and the front handle with your
left hand.
2. Place the groove of the planer on to the surface
to be cut.
3. Turn on planer and let it reach full speed.
4. Slowly move planer onto work.
5. ALWAYS maintain downward pressure on the
planer to keep it flat at the beginning and the
end of the work piece.
NOTE: Making several passes of more shallow
cuts will provide a smoother cut and makes it
easier to control planer.
Fig. 4
3/64
0
1/64
1/32
15
OPERATION cont.
Fig. 5
ACCESSORIES INCLUDED WITH YOUR PLANER
To make your planer even more versatile we have included 2 special accessories.
They are an Edge Guide and a Rabbeting Plate.
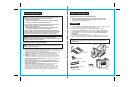
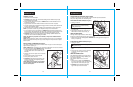
ATTACHING THE EDGE GUIDE (See Figure 5)
1. Unplug your planer.
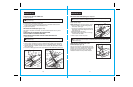
2. Insert the screw provided through the flat washer, then through the slot in the rabbeting
plate.
3. Insert screw into screw hole on the right side
of the main shoe and tighten securely
(see Fig. 6).
USING THE RABBET GUIDE
The Rabbet Guide attaches to the right side of
the planer. It is ideal for making rabbeting cuts
up to 15/16 inches thick.
The maximum width of cut is 15/16-inch
per cut.
1. When making a rabbet cut, ALWAYS place
the notch on the inside of the main shoe firmly
against the side of the board (see Fig. 6).
2. ALWAYS press the Rabbet Guide firmly
against the top surface of the board.
WARNING: Failure to unplug your
planer could result in accidental starting,
causing serious injury.
!
ATTACHING THE RABBET GUIDE (See Fig. 6)
1. Unplug your planer.
WARNING: Failure to unplug your planer could result in accidental starting,
causing serious injury.
!
2. Insert the screw provided through the hole in
the edge guide.
3. Tighten screw securely into screw hole on
either side of the main shoe (see Fig. 5).
USING THE EDGE GUIDE
The Edge Guide easily attaches to either side of
the planer. It is ideal for planing long and uneven boards.
1. When making cuts with the Edge Guide ALWAYS hold it firmly against the edge of the
board you are planing.
Edge
Guide
Screw
Fig. 6
Main
Shoe
Notch
Rabbet
Guide
0
1/64
7
/
6
4
i
n
c
h
0
1/64
7
/
6
4
i
n
c
h
Screw