


16
OPERATION cont.
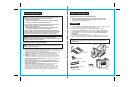
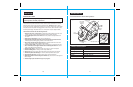
REPLACING THE BLADES (See Figures 7 to 9)
The blades in this planer are reversible, so when the blades become dull, they can be
reversed.
ALWAYS REPLACE OR REVERSE THE BLADES IN PAIRS.
DO NOT ATTEMPT TO SHARPEN THE BLADES.
NEVER OPERATE YOUR PLANER WITH ONLY ONE BLADE INSTALLED.
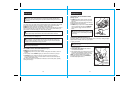
1. Unplug your planer.
Fig. 7
2. Place planer on a flat board or work piece.
3. Loosen the screw and position the bottom surface of the Rabbet Guide above the
board the same distance as the desired depth of cut.
4. Tighten screw securely.
TO ADJUST THE DEPTH OF RABBET CUT
1. Unplug your planer.
WARNING: Failure to unplug your planer could result in accidental starting,
causing serious injury.
!
Fig. 8
WARNING: Failure to unplug your planer could result in accidental starting,
causing serious injury.
!
Planer
Wrench
Work
Bench
Blade
Bolts
2. Place the planer upside down on the work bench. (See Fig. 7).
3. Use the wrench (included) to loosen the 3 bolts that hold the blade to the blade clamp.
To loosen bolts, turn them approximately 1/2 turn in a clockwise direction. (See Fig. 7).
4. Hold the blade clamp in position and use a piece of wood to slide the blade out of blade
clamp. (See Fig. 8).
5. Push down on blade guard when removing the blade from the blade clamp. (See Fig. 8).
Blade
Clamp
Blade
Clamp
Blade Guard
Piece
of
Wood
17
OPERATION cont.
REPLACING THE BLADES (See Figures 7 to 9) cont.
CAUTION: Blades are very sharp. ALWAYS handle blades very carefully.
Failure to do so could result in possible serious injury.
!
Fig. 9
Wrench
Bolts
Blade
Clamp
Blade
Fig. 10
NOTE: DO NOT remove the blade clamp. This could alter the factory setting for cutting
height and blade height.
NOTE: DO NOT adjust the height adjusting screws.
6. Place new blade or reverse existing blade into
blade clamp. (See Fig. 9).
7. Check to be sure blade is properly positioned in
blade clamp and the blade edge is level with the
base. (See Fig. 9).
8. Securely re-tighten the 3 bolts.
9. Repeat the steps 3 through 8 above to change
or reverse the other blade.
10. Remove piece of wood from planer.
Warning: ALWAYS remove the piece of wood before starting your planer.
Failure to do so could result in the piece of wood being thrown from your planer, causing
possible serious injury.
!
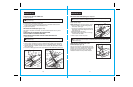
USING THE LEFT OR RIGHT DUST / CHIP
EXTRACTION (See Figure 10)
The dust / chip chute can be adjusted for left or right
extraction. Turn chute clockwise for extraction on the
left side, or turn it counterclockwise for extraction on
the right side. The arrow on the top of the chute
indicates the direction the chips will be extracted.
bi-directional dust extraction system