


12
OPERATION
PREPARING FOR OPERATION
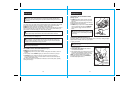
Your planer has a rear handle and front assist handle for ease of operation. They provide
the two-hand operation which is necessary to maintain proper control of the planer.
ALWAYS keep both hands clear of the blades and the cutting area.
ALWAYS use both hands when using the planer. Hold the front handle with your left hand
and the rear handle with your right hand (as shown in Fig, 2). This position makes your
planer easier to handle and keeps you clear of the chip exhaust.
WARNING: Your planer should NEVER be connected to power supply when you
are assembling parts, making adjustments, changing belts or blades, cleaning planer,
or when not in use. Disconnecting planer will prevent accidental starting that could cause
serious injury.
!
CAUTION: DO NOT plane too fast because this causes build up in the chip
exhaust. Chip build-up restricts air flow and can cause the motor to over heat.
!
DANGER: If the cord hangs up on the work during the cut, release the trigger
switch immediately. Unplug the planer and check the cord for damage. If there is no
damage, reposition the cord to prevent it from hanging up again. If the cord has been
damaged, have it replaced before using your planer.
!
WARNING: Using your planer with a damaged cord could cause electrical
shock resulting in serious injury.
!
Keep the cord away from the cutting area. ALWAYS place the cord so it does not hang up
on the work when you are making a cut.
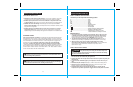
THE CORRECT WAY TO USE YOUR PLANER (See Fig. 2)
ALWAYS hold your planer as shown in Figure 2.
1. ALWAYS keep control of your planer. It makes cutting easier and safer, as shown in
Figure 2.
2. To help keep control, ALWAYS support your work so the cut will be on your right.
3. ALWAYS clamp your work so it does not move during the cut (see Figure 2).
The workpiece moving during a cut could result in the loss of control of the planer,
possibly causing serious injury.
The work moving during a cut could result in the loss of control of the planer, possibly
causing serious injury.
13
OPERATION cont.
THE CORRECT WAY TO USE YOUR PLANER
(See Fig. 2) cont.
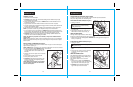
4. ALWAYS operate the planer with the chip chute
exhaust turned so it points away from your face
and eyes.
All visitors should wear safety glasses and be kept
a safe distance from the work area.
5. ALWAYS hold your planer so the blades DO NOT
come in contact with the work piece BEFORE
you squeeze the trigger switch and start the
planer.
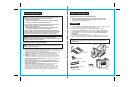
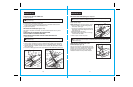
2. To increase cutting depth, rotate knob in a
clockwise direction.
3. To decrease cutting depth, rotate knob in a
counterclockwise direction.
4. We recommend that you make test cuts in scrap
wood after each adjustment to make sure the
planer is removing the desired amount of wood.
NOTE: To protect the blades during storage,
transporting and when not in use, ALWAYS set
the blade depth adjustment to 0.
WARNING: Keep a firm grip on the
tool with both hands at all times. Failure to do so
could result in loss of control leading to possible
serious injury.
!
TO ADJUST PLANING DEPTH (See Fig. 3)
The planing depth on your planer can be adjusted from 0 to 1/8 inch by rotating the depth
adjustment knob located on the front of your planer.
1. Unplug your planer.
WARNING: Failure to unplug your planer could result in accidental starting,
causing serious injury.
!
Fig. 2
1/32
3/64
0
1/64
Fig. 3
Depth
Adjustment
Knob
To Increase
Cutting Depth
Turn Clockwise
To Decrease
Cutting Depth Turn
Counterlockwise
0
1/64
7
/
6
4
i
n
c
h