


CHARGING A HOT BATTERY PACK
If the battery pack is above normal temperature range, the red LED will
illuminate and the green LED will be off. When the battery pack cools down to
approximately 104°F (40°C), the charger will automatically begin charging.
CHARGING A COLD BATTERY PACK
If the battery pack is below the normal temperature range, the red LED
will illuminate and the green LED will be off. When the battery warms to a
temperature of more than 32°F (0°C), the charger will automatically begin
charging.
DEFECTIVE BATTERY
If the charger detects a problem with the battery, the battery may be defective:
the red LED will begin flashing and the green LED will be off.
1.
2.
3.
If registering as defective, remove and reinsert the battery pack in the
charger. If the LED status reads "defective" a second time, try charging a
different battery pack.
If a different battery pack charges normally, dispose of the defective battery
pack (see Maintenance section).
If a different battery pack also indicates "defective," the charger may be
defective.
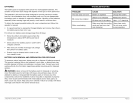
BATTERY CHARGING
If the battery pack is being charged within a normal surrounding temperature
range (32°F to 104°F), the green LED will begin flashing and the red LED will be
off. The battery pack will reach a full charge in 30 minutes.
BATTERY FULL
If the battery pack is within normal temperature range, the green LED will
illuminate and the red LED will be off. The battery pack is fully charged and
ready to use. The battery pack will fully charge, but will not overcharge, if left on
the charger.
NOTE: The charger may
become warm with several
continuous charge cycles. This
is part of the normal operation
of the charge. Charge in a well
ventilated area.
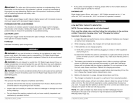
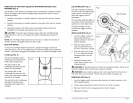
TO ATTACH BATTERY PACK
(Fig. 4)
1. Lock the trigger switch on
the Right-Angle Impact
Driver by placing the
Fig. 4
direction of rotation (forward/center IocW reverse) selector in the center
position.
2. Align the raised rib on the battery pack with the grooves in the Right-Angle
Impact Driver, and then insert the battery pack into the tool.
NOTE: Make sure that the latch on the battery pack snaps into place and that
the battery pack is secured to the tool before beginning operation.
_L. CAUTION: When placing the battery pack in the tool, be sure that the
raised rib on battery pack aligns with the groove inside the Right-Angle Impact
Driver and that the latches snap into place properly. Improper attachment of the
battery pack can cause damage to internal components.
TO
1.
2.
DETACH BATTERY PACK (Fig, 4)
Lock the trigger switch on the Right-Angle Impact Driver by placing the
direction of rotation (forward / center lock/reverse) selector in the Center
Lock position.
Depress the battery release buttons located on the both sides of the battery
pack to release the battery pack.
3. Pull the battery pack out and remove it from the tool.
_lk WARNING: Battery tools are always in operating condition. Therefore, the
direction-of-rotation selector should always be locked when the tool is not in use
or when carrying it your side.
TRIGGER SWITCH (Fig, 5)
To turn the 12V Right-Angle
Impact Driver ON, depress the
trigger switch.
To turn it OFF, release the
trigger switch.
VARIABLE SPEED (Fig,5)
The variable-speed trigger
switch delivers higher speed
with increased trigger pressure
and lower speed with decreased
trigger pressure.
Fig. 5
Variable-speed
trigger switch
Direction-
of-rotation
selector
(Forward/
Center
Lock/
Reverse
17562 ManuaLRevised_$0 0607 Page 14 17562 ManuaLRevised_10 0607 Page 15