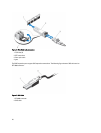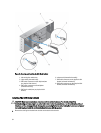
Figure 18. Removing and Installing the Physical-Disk Drawer
1. physical-disk drawer
2. release tab
Installing The Disk Drawer
CAUTION: Many repairs may only be done by a certified service technician. You should only perform
troubleshooting and simple repairs as authorized in your product documentation, or as directed by the online or
telephone service and support team. Damage due to servicing that is not authorized by Dell is not covered by your
warranty. Read and follow the safety instructions that came with the product.
1. Align the physical-disk drawer with the slot on the chassis.
2. Slide the disk drawer into the chassis until it is seated properly and the release tabs snap into place.
3. Install the physical disks row wise into the physical-disk drawer.
NOTE: Using the note that you saved while removing the physical-disk drawer, install the physical disks to the
same location in the physical-disk drawer that they were in.
4. Close the disk drawer.
5. Install the SAS chain cables.
6. Install the front bezel.
7. Using the MD Storage Manager, verify that the new physical-disk drawer is identified and operating correctly.
27


