


13
OPERATION
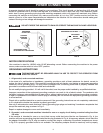
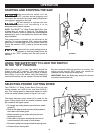
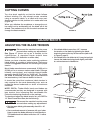
TILTING THE TABLE
Disconnect the machine from the
power source!
See Figure 14.
You can tilt the band saw table up to 45° to the right. To
tilt the table to the right.
• Loosen the black table tilt locking wing nut (A),
located underneath the lower trunnion.
• Tilt the table to the desired angle as shown on the tilt
scale (B).
• Retighten the table tilt locking wing nut.
The table can also be tilted 3° to the left for
applications such as cutting cast moldings. To tilt the
table to the left:
• Follow the instructions above and tilting the table to
the right. The table should be tilted enough to allow
access to the 0° stop bolt (C) located on the lower
trunnion.
• Remove the 0° stop bolt.
• Loosen the table tilt locking wing nut, tilt the table all
the way to left.
• Retighten the table tilt locking wing nut.
FIGURE 14
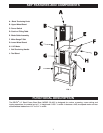
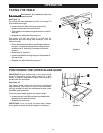
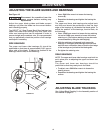
POSITIONING THE UPPER BLADE GUIDE
IMPORTANT: Proper positioning of the upper blade
guide is required to ensure an accurate cut. It also
serves to prevent operators fingers from coming in
contact with the saw blade.
See Figure 15.
The upper blade guide (A) should be positioned
approximately 1/16" above the top of the workpiece,
just high enough to allow the workpiece to pass under
the blade guide assembly.
To set the upper blade guide to the proper height:
• Loosen the lock knob (B) and move the blade guide
assembly to the desired position.
• Retighten the lock knob.
IMPORTANT: Prior to using the band saw, always
check guide post lock knob and tighten if necessary.
FIGURE 15