


4
Fig. 4
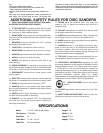
UNPACKING AND CLEANING
Your new Disc Sander is shipped complete in one container. Carefully unpack the sander and all loose items from the
shipping container. Fig. 2, illustrates the sander and all loose items. Remove the protective coating from machined sur-
faces of the machine. This coating can be removed with a soft cloth moistened with kerosene (do not use acetone,
gasoline or lacquer thinner for this purpose). After cleaning, cover all unpainted surfaces with a good quality paste
wax.
ASSEMBLY INSTRUCTIONS
The 12" Disc Sander is shipped completely assembled, except the dust hose. WARNING: FOR YOUR OWN SAFE-
TY, DO NOT CONNECT THE SANDER TO THE POWER SOURCE UNTIL THE MACHINE IS COMPLETELY ASSEM-
BLED AND YOU HAVE READ AND UNDERSTOOD THE ENTIRE OWNER’S MANUAL.
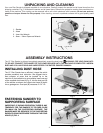
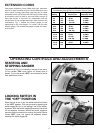
INSTALLING DUST HOSE
The 12" Disc Sander has an efficient, integral fan which
provides excellent dust collection. We suggest that a
dust collector of some kind be hooked up to the
machine. If dust collection is not available, insert one end
of the supplied dust hose (A) Fig. 3, into the dust port (B)
of the sander as shown and drape dust hose (A) down
into a garbage can. Dust port (B) measures 2-1/4" I.D.
1 - Sander
2 - Hose
3 - 4mm Hex Wrench
4 - 8mm - 10mm Open-end Wrench
Fig. 3
Fig. 2
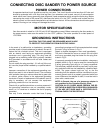
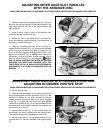
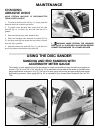
FASTENING SANDER TO
SUPPORTING SURFACE
IMPORTANT: IF DURING OPERATION THERE IS ANY
TENDENCY FOR THE SANDER TO TIP OVER, SLIDE
OR WALK ON THE SUPPORTING SURFACE, THE
SANDER MUST BE SECURED TO THE SUPPORTING
SURFACE USING FASTENERS THROUGH THE FOUR
HOLES (C) FIG. 4.
4
3
2
1
A
B
C
C