


10
OPERATION
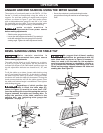
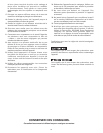
ANGLED AND END SANDING USING THE MITER GAUGE
The majority of work performed on the DELTA
®
12” Disc
Sander is usually accomplished using the table as a
support. For accurate sanding of angled and end-grain
surfaces, as shown in Figure 7, your disc sander comes
with an adjustable miter gauge (A) and 3/8" x 3/4" t-slot
(B) machined into the table. To use the provided miter
gauge for angled or end-grain sanding , do the following:
make certain machine is
disconnected from power source
before making adjustments.
• Slide the miter gauge into the t-slot.
• Loosen the miter adjustment handle (C) by rotating it
to the left and adjust the miter gauge to the desired
sanding angle. Tighten the miter adjustment handle.
FIGURE 7
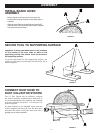
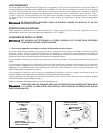
BEVEL SANDING USING THE TABLE TILT
Make certain machine is
disconnected from power source
before making adjustments.
The table can be tilted up to 45 degrees up or down.
A scale (A), Figure 8, and pointer (B) are provided to
indicate the degree of tilt. Ball-indent positive stops on
the tilt adjustment indicator are located at 0°, 35°, and
45°.
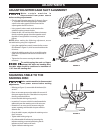
To tilt the table up or down, loosen table locking wing
nut (C) and rotate the knob (D). As the knob is rotated,
the table will pivot either up or down. Turning the knob
clockwise will make the table tilt downward. Turning the
knob counterclockwise will tilt the table upward. Pivot
the table until desired angle is established. Then tighten
table locking wing nut.
Regardless of which position the
table is tilted, the table edge (E),
shown in Figure 10, must be no more than 1/16"
from the sanding disc to avoid trapping the work or
fingers between the table and sanding disc. To
adjust the position of the table relative to the
sanding disc, see “adjusting miter gauge slot
alignment “ on page 11.
FIGURE 8
FIGURE 9
We suggest that all bevel sanding
applications be performed with the
table tilted down as shown in Figure 9; however, if
there is a need to tilt the table up, the workpiece
must be securely fastened or clamped to a fixture or
jig to prevent the workpiece from being torn from
hands and becoming trapped between the table and
sanding disc. See Figure 10.
• Ensure the workpiece is positioned along the miter
gauge before turning the machine on and starting to
work.
FIGURE 10