


12
Fig. 23
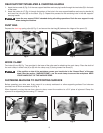
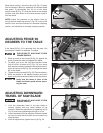
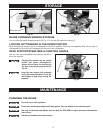
When bevel cutting, move the fence (A) Fig. 23 away
from the blade to allow for clearance for the saw blade
and guard. To accomplish this, lift up on the fence
tension knob (B) Fig. 22, slide the fence to the desired
location, and push down on the fence tension knob to
lock the fence.
NOTE: Adjust the pressure on the tension knob by
turning the hex-head cap screw (C) Fig. 22 on top of the
tension knob counter-clockwise to decrease clamping
tension, and clockwise to increase clamping tension.
43
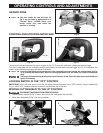
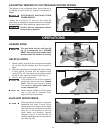
ADJUSTING FENCE 90
DEGREES TO THE TABLE
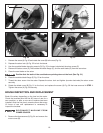
If the fence (A) Fig. 24 is removed from the saw, You
must adjust it when it is replaced. To adjust:
1. Place one end of the square (B) Fig. 24 against the
fence (A) and the other end against the blade.
2. To adjust, pull up on the two fence tension knobs
(one of which is shown at (C) Fig. 24), and move
both fences outward. Loosen the four screws (two of
which are shown at (D) Fig. 25), and adjust the fence
90° to the blade.
3. Tighten the four screws (D) Fig. 25 (Two are shown.)
4. Move the fences to the desired location and push
down on the fence tension knobs to lock the fences.
Verify that the fence is clear of the
blade and blade guard before opera-
ting the saw.
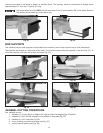
Fig. 25
Fig. 26
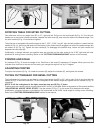
ADJUSTING DOWNWARD
TRAVEL OF SAW BLADE
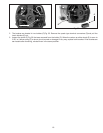
1. Limit the downward travel of the saw blade to
prevent contact with any metal surface of the
machine. Make this adjustment by loosening nut (A)
Fig. 26, and turning adjusting screw (B) in or out.
2. Lower the blade as far as possible. Rotate the blade
by hand to verify that the teeth do not contact any
metal surface.
3. After all adjustments, tighten the nut (A) Fig. 26.
A
B
C
D
A
B
A
DISCONNECT MACHINE FROM
POWER SOURCE.
DISCONNECT MACHINE FROM
POWER SOURCE.