


8
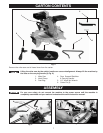
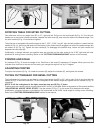
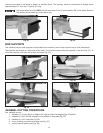
DUST BAG
Depress the dust bag spring clips (A) Fig. 6, and secure the dust bag (B) between the ridges of the spout (C).
Fig. 6
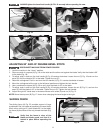
WORK CLAMP
Two holes (A) and (B) Fig. 7 are provided in the base of the miter saw for attaching the work clamp. Place the shaft of
the work clamp in either hole (A) or (B) with the clamp cup (C) facing toward the fence (D).
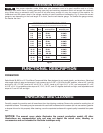
If the position or size of the workpiece causes your hand to be in the “Hazard Zone” of the saw
blade (See the section “HAZARD ZONE”), use the work clamp to secure the workpiece. KEEP
YOUR HANDS OUT OF THE HAZARD ZONE.
Fig. 7
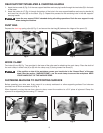
FASTENING MACHINE TO SUPPORTING SURFACE
Before operating your miter saw, firmly mount it to a sturdy workbench or other supporting surface. Four holes are
provided, two of which are shown at (A) Fig. 8.
When frequently moving the saw from place to place, mount the machine to a 3/4" piece of plywood. Clamp the
plywood to a supporting surface using “C” clamps.
Fig. 8
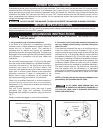
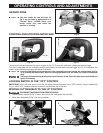
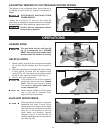
REAR SUPPORT/STABILIZER & CARRYING HANDLE
1. Insert the two ends (A) Fig. 3 of the rear support/stabilizer and carrying handle through the two holes (B) in the back
of the base.
2. Insert the cotter pin (C) Fig. 4 through the bottom of the hole in the rear support/stabilizer and carrying handle (A)
and bend the two pins (B) on the back. (Fig. 5). Repeat this process for the remaining hole in the rear support/
carrying handle.
Leave the rear support FULLY extended during all cutting operations. Push the rear support in only
when storing the machine.
Fig. 5
A
B
C
A
B
C
D
A
A
B