


18
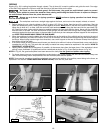
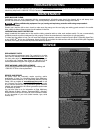
When cross-cutting a number of workpieces to the same length, use the stop (A) Fig. 40 as your cut-off gauge. Once the cut-off length
is determined, use the miter gauge ONLY to feed the workpiece into the cut.
Never use the fence as a cut-off gauge when cross-cutting.
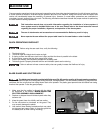
BEVEL CROSSCUTTING
Bevel crosscutting (Fig. 41) is the same as crosscutting except the bevel angle is set to an angle other than 0°.
When possible, use the right miter gauge slot when bevel crosscutting so that the blade tilts away from the
miter gauge and your hands.
Use caution when starting the cut to prevent binding of the guard against the workpiece.
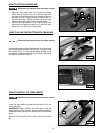
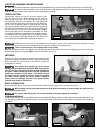
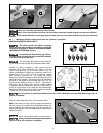
COMPOUND MITERING
Compound Mitering (Fig. 42) is a combination of bevel crosscutting and mitering, where the blade is beveled to an angle other than 0° and
the miter gauge is locked at an angle other than 0°. Always use the miter slot (D) which allows the blade to tilt away from the miter gauge
and hands.
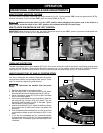
MITERING
Mitering (Fig. 40A) is the same as crosscutting except the miter
gauge (C) is locked at an angle other than 0°. Clamp the workpiece
firmly, and feed the work slowly into the blade to prevent the
workpiece from moving.
Use caution when starting the cut to prevent
binding of the guard against the workpiece. Miter angles greater
than 45° may force the guard into the saw blade and damage
the guard. Before starting the motor, test the operation by
feeding the workpiece into the guard. If the guard contacts
the blade, place the workpiece under the guard, not touching
the blade, before starting the motor. Certain workpiece
shapes, such as mouldings, may not lift the guard properly.
Feed the work slowly to start the cut.
Fig. 41 Fig. 42
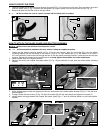
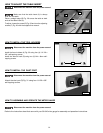
Cross-cutting requires the use of the miter gauge to posi-
tion and guide the work. Before starting the cut, raise the
blade so that it is about 1/8” (3.2mm) higher than the top of
the workpiece. Place the work against the miter gauge and
advance both the gauge and work toward the saw blade (Fig.
40). You can use the miter gauge in either table slot. Start the
cut slowly and hold the work firmly against the miter gauge and
the table. Keep both hands on the miter gauge and workpiece.
Do not touch the cut-off piece. Feed the workpiece steadily
through the blade until the workpiece is completely cut. Shift
the workpiece slightly to the side away from the blade, then pull
the workpiece and miter gauge back to the starting position.
Turn of the saw and remove the workpiece. Then remove the
cut-off piece from the table before beginning the next cut.
CROSS-CUTTING
Fig. 40
A
D
Fig. 40A
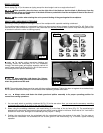
A NOTE ON CLAMPING THE MITER GAUGE
Be sure the workpiece is long enough to be clamped securely. Loosely clamped boards can be thrown and cause injury.
To make sure the miter gauge moves freely, be sure the miter gauge clamp (K) Fig. 40 is in line with the miter bar in the
T-slot (T). Clamping to either side of the bar restricts miter gauge movement.
K
T
C
NEVER touch the “free end” of the workpiece or a “free piece” that is cut off, while the power is ON and/or the saw
blade is rotating. Piece may contact the blade resulting in a thrown workpiece and possible injury.