


11
A
B
C
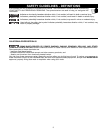
Fig. 9 Fig. 10 Fig. 11
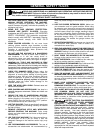
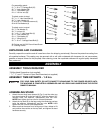
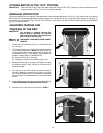
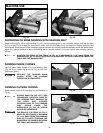
DISCONNECT MACHINE FROM POWER
SOURCE.
1. Thread the disc table trunnion stud (A) Fig. 12 into
the hole (B) on the side of the machine and tighten
snug.
2. Place the disc table trunnion clamp (C) on the stud
and insert the two pins (D) in the two holes (E).
3. Attach the washer, spring, and knob (Inset - Fig. 12)
4. Follow the same procedure for the other side.
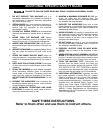
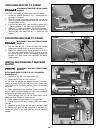
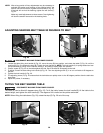
5. Place the table in position. Confirm that the table
trunnion (A) Fig. 13A rests in the groove (B) of the
attaching clamps. Tighten the knob (C)
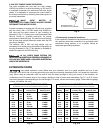
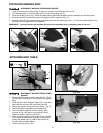
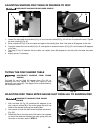
6. Remove the disc table trunnion knob (C) from the side
of the machine where there is a scale on the trunnion.
Attach the pointer (A) Fig. 13B to the hole (B) on
the disc table trunnion clamp.
7. Tighten the knob (C) Fig. 13A.
Fig. 12
A
B
C
D
D
E
E
Fig. 13A
A
B
C
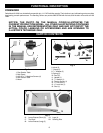
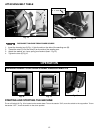
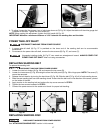
ATTACHING DISC TABLE
DISCONNECT MACHINE FROM POWER SOURCE.
1. Clean the sanding disc plate (A) Fig. 9 of any oil or grease, and be certain that it is dry.
2. Peel approximately 1/2 of the backing (B) Fig. 9 from the sanding disc (C).
3. Insert the sanding disc (C) Fig. 9 with the paper backing downward between the disc assembly and the disc guard.
4. Press the top half of the sanding disc firmly against the disc assembly (Fig. 10).
5. Manually rotate the disc assembly and remove the paper from the sanding disc (Fig. 11). Press the remaining half of the
sanding disc firmly against the disc assembly.
IMPORTANT:
Securely position the sanding disc on the disc assembly prior to applying power to the tool.
ATTACHING SANDING DISC
Fig. 13B
A
B