


11
Fig. 11
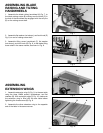
Fig. 12
Fig. 13
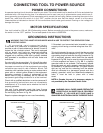
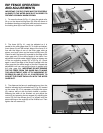
5. Using the open end wrench (F) Fig. 11 and Fig. 12,
supplied, place the wrench (F) on the flats on the saw
arbor to keep the arbor from turning and tighten arbor
nut (E) (turn counterclockwise) using the remaining
wrench (G) Fig. 12.
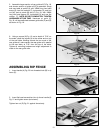
6. Replace table insert (A) Fig. 13, making certain
that it is flush with table surface and rubber washer
is in place.
7. Place a straight edge or square (H) Fig. 13, on the
saw table extending over the table insert (A) as shown. If
an adjustment is necessary, tighten or loosen the two
adjustment screws (K).
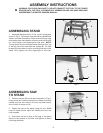
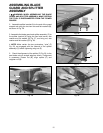
ASSEMBLING SAW BLADE
1. Make certain the tool is disconnected from the
power source.
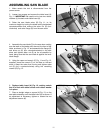
2. Loosen two screws and remove the table insert (A)
Fig. 11. IMPORTANT: Be careful not to lose two rubber
washers (L) located under table insert (A).
3. Raise the saw blade arbor (B) Fig. 11, to its
maximum height by turning the blade raising handwheel
counterclockwise and remove the arbor nut (E) (turn
clockwise) and outer flange (D) from the saw arbor.
4. Assemble the saw blade (C) to the saw arbor making
sure the teeth of the blade point down at the front of the
table, as shown in Fig. 12, and assemble the flange (D)
and arbor nut (E) (turn counterclockwise) to the saw
arbor and tighten arbor nut (E) as far as possible by
hand, being sure that the saw blade is against the inner
blade flange.
F
A
B
E
D
F
C
G
D
E
H
K
K
A
L
L