


4
English
e. Do not use dull or damaged blade. Unsharpened or improperly
set blades produce narrow kerf causing excessive friction, blade
binding, and KICKBACK.
f. Blade depth and bevel adjusting locking levers must be
tight and secure before making cut. If blade adjustment shifts
while cutting, it may cause binding and KICKBACK.
g. Use extra caution when making a “Pocket Cut” into existing
walls or other blind areas. The protruding blade may cut
objects that can cause KICKBACK.
Additional Specific Instructions
CAUTION: When cutting into walls, floors or wherever live electrical
wires may be encountered, DO NOT TOUCH ANY METAL PARTS
OF THE TOOL! Hold the tool only by insulated grasping surfaces to
prevent electric shock if you cut into a live wire.
• KEEP BLADES CLEAN AND SHARP. Sharp blades minimize
stalling and kickback.
DANGER: KEEP HANDS AWAY FROM CUTTING AREA. Keep
hands away from blades. Do not reach underneath work while blade
is rotating. Do not attempt to remove cut material when blade is
moving.
CAUTION: Blades coast after turn off.
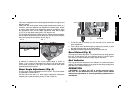
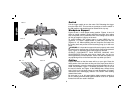
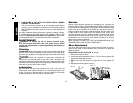
• SUPPORT LARGE PANELS. Large panels must be supported
as shown in Figure 10 to minimize the risk of blade pinching and
kickback. When cutting operation requires the resting of the saw
on the work piece, the saw shall be rested on the larger portion and
the smaller piece cut off.
• GUARD AGAINST KICKBACK. Kickback occurs when the saw
stalls rapidly and is driven back towards the operator. Release
switch immediately if blade binds or saw stalls. Keep blades sharp.
Support large panels as shown in Figure 10. Use fence or straight
edge guide when ripping. Don’t force tool. Stay alert-exercise
control. Don’t remove saw from work during a cut while the blade
is moving.
• ADJUSTMENTS. Before cutting be sure depth and bevel
adjustments are tight.
• AVOID CUTTING NAILS. Inspect for and remove all nails from
lumber before cutting.
• NEVER use abrasive cut-off wheels.
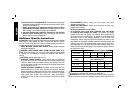
• An extension cord must have adequate wire size (AWG
or American Wire Gauge) for safety. The smaller the gauge
number of the wire, the greater the capacity of the cable, that is
16 gauge has more capacity than 18 gauge. An undersized cord
will cause a drop in line voltage resulting in loss of power and
overheating. When using more than one extension to make up the
total length, be sure each individual extension contains at least the
minimum wire size. The following table shows the correct size to
use depending on cord length and nameplate ampere rating. If in
doubt, use the next heavier gauge. The smaller the gauge number,
the heavier the cord.
Voltage (Volts) Total length of cord in meters (m)
120 - 127V 0 - 7 7 - 15 15 - 30 30 - 50
220 - 240V 0 - 15 15 - 30 30 - 60 60 - 100
Rated Ampere
range
Minimal cross-sectional area of the
cord in meters (mm
2
)
0 - 6A 1.0 1.5 1.5 2.5
6 - 10A 1.0 1.5 2.5 4.0
10 - 12A 1.5 1.5 2.5 4.0
12 - 16A 2.5 4.0 Not Recommended
WARNING: Always use eye protection. All users and bystanders
must wear eye protection that conforms to ANSI Z87.1.
WARNING: Some dust created by power sanding, sawing, grinding,
drilling, and other construction activities contains chemicals known to