


6
English
As little as 10% lower voltage can cause loss of power and can result
in overheating. All D
EWALT tools are factory-tested; if this tool does
not operate, check the power supply.
ADJUSTMENTS AND SETUP
WARNING: To reduce the risk of serious personal injury,
turn tool off and disconnect tool from power source before
making any adjustments or removing/installing attachments or
accessories.
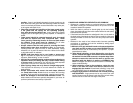
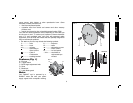
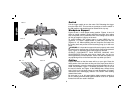
Attaching And Removing Blades (Fig. 1–4)
To attach the blade, retract lower blade guard (F) and place inner
clamp washer (G) and blade on saw spindle with printed side of
blade out. [Teeth at bottom of blade pointing forward, Fig. 2]. Place
outer clamp washer (H) on saw spindle. The larger surfaces of both
washers must face the blade. Thread on blade clamping bolt (E) firmly
by hand to hold both blade washers in position. Depress the lock pin
(I, Fig. 3) and turn the saw spindle until lock pin engages the shaft.
Tighten blade bolt clockwise with blade wrench.
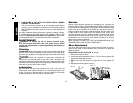
FIG. 4FIG. 3
I
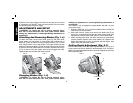
Changing Blades (Fig. 1–4)
WARNING: To reduce the risk of serious personal injury,
turn tool off and disconnect tool from power source before
making any adjustments or removing/installing attachments or
accessories.
Your D
EWALT saw is equipped to accept blades with 5/8" (16 mm)
round arbor holes.
1. Depress LOCK PIN, (I, Fig. 3) and turn blade until the LOCK PIN
locks firmly into the saw shaft.
2. With blade wrench, loosen and remove the blade bolt (E) by
turning it in a counterclockwise direction when facing blade (right
hand thread). Retract lower blade guard (F) and remove blade.
3. When mounting new blade, the teeth must point in the direction
of blade rotation. Replace outer clamp washer (H). Replace and
tighten the blade bolt as much as possible with the fingers, then
tighten firmly with the blade wrench.
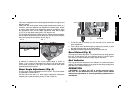
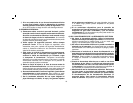
Cutting Depth Adjustment (Fig. 5–7)
Hold the saw firmly. Raise the depth adjustment lever (J, Fig. 5) to
loosen and move shoe to obtain the desired depth of cut, as shown.
Make sure the depth adjustment lever has been retightened (lowered)
before operating saw.
FIG. 5
J
LOOSEN
TIGHTEN
K