


English
9
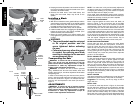
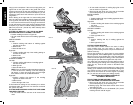
BEVEL CUTS
A bevel cut is a crosscut made with the saw blade at a
bevel to the wood. In order to set the bevel, loosen the
bevel clamp knob and move the saw to the left as desired.
(It is necessary to move the left side of the fence to
allow clearance). Once the desired bevel angle has been
set, tighten the bevel clamp knob firmly.
Bevel angles can be set from 3° right to 48° left and can
be cut with the miter arm set between zero and 50° right or
left. Ensure the fence has been adjusted properly. When
cutting left bevel, or right miter compound cuts, it will be
necessary to remove the adjustable fence.
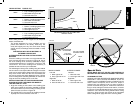
QUALITY OF CUT
The smoothness of any cut depends on a number of
variables. Things like material being cut, blade type, blade
sharpness and rate of cut all contribute to the quality of
the cut.
When smoothest cuts are desired for molding and other
precision work, a sharp (60–80 tooth carbide) blade and a
slower, even cutting rate will produce the desired results.
Ensure that material does not creep while cutting. Clamp it
securely in place. Always let the blade come to a full stop
before raising arm.
If small fibers of wood still split out at the rear of the
workpiece, apply a piece of masking tape on the wood
where the cut will be made. Saw through the tape and
carefully remove tape when the cut is finished.
For varied cutting applications, refer to the list of
recommended saw blades for your saw and select the
one that best fits your needs (Page 4).
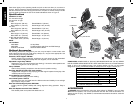
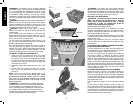
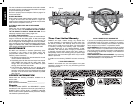
BODY AND HAND POSITION (FIG. 16)
Proper positioning of your body and hands when operating
the miter saw will make cutting easier, more accurate and
safer. Never place hands near cutting area. Place hands
no closer than 6" (152 mm) from the blade. Hold the
workpiece tightly to the table and the fence when cutting.
Keep hands in position until the trigger has been released
and the blade has completely stopped. ALWAYS MAKE
DRY RUNS (UNPOWERED) BEFORE FINISH CUTS SO
THAT YOU CAN CHECK THE PATH OF THE BLADE.
DO NOT CROSS HANDS, AS SHOWN IN FIGURE 15A.
Keep both feet firmly on the floor and maintain proper
balance. As you move the miter arm left and right, follow
it and stand slightly to the side of the saw blade. Sight
through the guard louvers when following a pencil line.
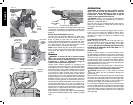
CLAMPING THE WORKPIECE
WARNING: To reduce the risk of serious personal
injury, turn off the tool and disconnect it from the
power source before attempting to move it, change
accessories or make any adjustments accept as
written in laser adjustment instructions.
PROPER HAND POSITION
FIG. 16
IMPROPER HAND POSITION
FIG. 16A
IMPROPER HAND POSITIONPROPER HAND POSITION