


English
10
English
10
tightened. This will prevent the saw from sliding along its
rails as the workpiece is engaged.
NOTE: Although this saw will cut wood and many
non-ferrous materials, we will limit our discussion to the
cutting of wood only. The same guidelines apply to the
other mat erials. DO NOT CUT FERROUS (IRON AND
STEEL) MAT ERIALS OR MASONRY WITH THIS SAW.
Do not use any abrasive blades.
CROSSCUTS
Cutting of multiple pieces is not recommended but can
be done safely by ensuring that each piece is held firmly
against the table and fence. When the saw comes up to
speed (about 1 second) lower the arm smoothly and slowly
to cut through the wood. Let the blade come to a full stop
before raising arm.
A crosscut is made by cutting wood across the grain at
any angle. A straight crosscut is made with the miter arm
at the zero degree position. Set and lock the miter arm at
zero, hold the wood firmly on the table and against the
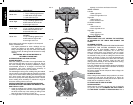
fence. With the rail lock knob tightened, turn on the saw by
squeezing the trigger switch shown in Figure 4.
When the saw comes up to speed (about 1 second) lower
the arm smoothly and slowly to cut through the wood. Let
the blade come to a full stop before raising arm.
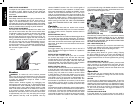
When cutting anything larger than 4.4" (111.8 mm)
[3" (76.2 mm) 45º miter] use an out-down-back motion
with the rail lock knob loosened. Pull the saw out, toward
you, lower the saw head down toward the workpiece, and
slowly push the saw back to complete the cut. Do not
allow the saw to contact the top of the workpiece while
pulling out. The saw may run toward you, possibly causing
personal injury or damage to the workpiece.
CAUTION: Always use a work clamp to maintain
control and reduce the risk of workpiece damage and
personal injury.
NOTE: The rail lock knob shown in Figure 4 must be loose
to allow the saw to slide along its rails.
Miter crosscuts are made with the miter arm at some angle
other than zero. This angle is often 45º for making corners,
but can be set anywhere from left or right. Make the cut as
described above.
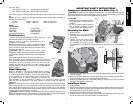
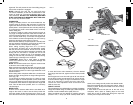
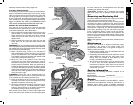
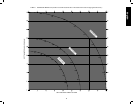
When cutting wider workpieces wider than a 2 x 6 that are
shorter in length, always place the longer side against the
fence (Fig. 12).
To cut through an existing pencil line on a piece of wood,
match the angle as close as possible. Cut the wood a little
too long and measure from the pencil line to the cut edge
to determine which direction to adjust the miter angle and
recut. This will take some practice, but it is a commonly
used technique.
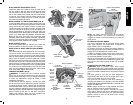
BEVEL CUTS
A bevel cut is a crosscut made with the saw blade at an
angle to the wood. In order to set the bevel, loosen the
bevel lock handle, lift the bevel latch lever, Figure 4, and
move the saw to the left or right as desired. (It is necessary
FIG. 12
PROPER CUT
FIG. 13A
FIG. 13B
FIG. 11
to move the fence to allow clearance). Once the desired
bevel angle has been set, tighten the bevel clamp handle
firmly.
Bevel angles can be set from 48º right to 48º left and can
be cut with the miter arm set between 50º right or 60º left.
At some extreme angles, the right or left side fence might
have to be removed. To remove the left or right fence,
unscrew the fence adjustment knob several turns and
slide the fence out.
QUALITY OF CUT
The smoothness of any cut depends on a number of variables.
Things like material being cut, blade type, blade sharpness
and rate of cut all contribute to the quality of the cut.
When smoothest cuts are desired for molding and other
precision work, a sharp (60 tooth carbide) blade and a
slower, even cutting rate will produce the desired results.
Ensure that material does not creep while cutting, clamp it
securely in place. Always let the blade come to a full stop
before raising arm.
If small fibers of wood still split out at the rear of the
workpiece, stick a piece of masking tape on the wood
where the cut will be made. Saw through the tape and
carefully remove tape when finished.
IMPROPER CUTS