


English
8
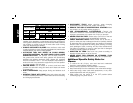
TO PLANE TWISTED WOOD
WARNING: TWISTED WOOD MAY
JAM YOUR THICKNESS PLANER. IF A JAM
OCCURS, TURN THE POWER OFF,
DISCONNECT THE POWER SUPPLY AND RAISE THE CARRIAGE
TO RELEASE THE MATERIAL FROM THE CUTTER HEAD.
If your material is only slightly twisted:
Plane both sides alternating from one to the other until the desired
thickness is reached.
TO PLANE CUPPED WOOD
To obtain the best possible results with
cupped wood:
Rip the material down the middle and plane it as two separate pieces.
Ripping the material reduces the severity of the cup and allows
the machine to deliver better results. Understand that you will have
to remove more material on cupped wood to achieve the desired
thickness than you would on a normal board.
If ripping the material is not an option:
Plane one side of the material until flat, then plane the opposite side
until it is also flat.
NOTE: Do not flip the board back and forth between each pass as
recommended by the general planing directions.
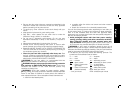
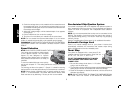
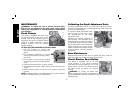
TO PLANE BOWED WOOD
The feed rollers and cutter head in your planer will push the bow out
of the material as it feeds. However, when the material exits the
planer, the pressure of the rollers
TOP FLAT
BOTTOM FLAT
and cutter head will release allowing
the wood to spring back into a
bowed formation. To properly
remove the bow, use a jointer.
BOWED WOOD WILL BE
FLATTENED BY FEED ROLLERS
AND CUTTER HEAD…
… BUT BOW WILL RETURN
AFTER WOOD IS PLANED
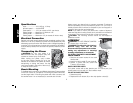
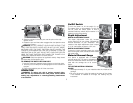
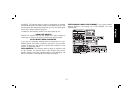
Changing the Planer Knives
WARNING: DISCONNECT THE PLANER FROM THE POWER
SOURCE BEFORE ATTEMPTING TO CHANGE OR ACCESS THE
KNIVES.
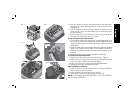
TO CHANGE PLANER KNIVES
1. Use the T-wrench to remove the four screws in the top of the
planer.
2. Lift the top off (Fig. 1) and place it aside.
3. Remove the three wing nuts that seal the dust shroud over the
cutter head.
4. Rotate the dust shroud up so the round connection that locks
onto the fan housing is in the open position (Fig. 2).
5. Push the dust shroud to the left so it disengages from the fan
housing.
6. Take the dust shroud out of the unit (Fig. 3) and set it aside.
7. The cutter head is now exposed.
If the eight screws in the cutter head clamp are not visible, use
a piece of scrap wood to carefully rotate the cutter head (Fig. 4)
until the screws are accessible and the cutter head lock lever (R)
engages. This will prevent further rotation of the cutter head as
you change the knives.
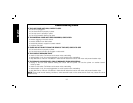
WARNING: KEEP YOUR FINGERS AWAY FROM THE
CUTTER HEAD AT ALL TIMES. USE THE TOOL PROVIDED TO
HANDLE THE KNIVES.