


6
Questions? Call toll free: 888-783-2612
SURFACE AND JOB PREPARATION
THINNING
Your Spray Station is supplied with a viscosity cup. Viscosity is a technical term used to indicate if a product is very thin or very thick. If thin, the
viscosity is said to be low, while if very thick the viscosity is said to be high. Viscosity is measured in seconds. In order to spray some materials they
need to be “thinned” (diluted). Thinning is very important when spraying. Most paints etc are supplied ready for brush application and may need to be
thinned (diluted) for spraying purposes.
The Spray Station 5500 has a viscosity rating of 160 seconds. If the paint has emptied the viscosity cup in less than 160 seconds then you will
not need to thin your paint or material. If it is above this then thinning will be required.
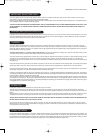
Your spray station comes equipped with a viscosity cup, which will help you determine the thickness of the paint. To test a liquids viscosity, dip the
viscosity cup into the material and fill up to the top, lift free and time how long it takes for the paint to empty the viscosity cup - stop when the
continuous flow ends from the bottom of the cup. The time determines the material viscosity and the need for the paint to be thinned before being
sprayed (Fig.1).
If the paint requires thinning, start with a 10% dilution of the paint. To do this, fill a 1litre container with the required paint. The viscosity cup supplied
with the unit holds 1/10 of a litre, block the hole in the viscosity cup and fill up with the required thinner. Add the thinner to the paint and stir.
If the paint requires further thinning, dilute the paint by another 5% (5% will be equal to half a viscosity cup) with the required thinner and measure
the viscosity, if the paint is not at it's recommended viscosity, repeat the above step.
Follow the manufacturerʼs guide for thinning in conjunction with a spray gun. If in doubt please contact the manufacturers of the paint. The viscosity
cup will help you determine the correct thickness of the paint. Paint is “thinned” by adding the substance which the paint is based upon. If a water based
paint then water is added, if oil based then mineral spirit.
As some paints, wood preservatives and other sprayable materials contain particles that have differing qualities, please ensure that when filling the
paint container of the spray gun, that the paint is filtered through either a funnel with a filter on it or through nylon tights or stockings. This will ensure
that no large particles enter the paint container, so preventing blockages and providing you with trouble free spraying. Ensure that a face mask, gloves
and goggles are worn at all times when spraying.
Preparation of the surface and thinning of the paint are the two most important areas to be concerned with to obtain the best results from your spray
kit. Ensure all surfaces are free from dust, dirt, rust and grease. If necessary rub down with sandpaper, or similar. Masking of areas is important to
ensure you do not spray those areas you wish to remain untouched.
Fill the paint container with the material to be sprayed. Take care not to overfill.
Take the spray gun unit and with the Clamp Lever (22) turned fully anti-clockwise, locate the spray gun unit into the paint container. Rotate the
container until the 2 pins locate into the recesses in the Yoke (23). Now turn the clamp lever clockwise to secure the container to the lid. Do not over
tighten.
Place the motor unit onto a clean floor space, free from any loose debris, liquids or dust sheets that could block the motor inlet. Uncoil the air hose
and attach it to the back of the spray gun and the other end to the Spray Station. Uncoil the power cord from the base of the unit and plug in.
ALWAYS KEEP THE MOTOR UNIT AS FAR AWAY FROM THE SPRAYING AREA AS POSSIBLE TO PREVENT PAINT CONTAMINATING THE
MOTOR. MASK ANY AREA YOU DO NOT WISH TO SPRAY.
Once you have set up and are ready to spray, switch on the unit. No paint will be sprayed from the gun until the trigger on the spray gun is pulled.
Before starting any work on spraying actual objects we suggest you spend a small amount of time practicing on cardboard or newspaper until you
have got used to how the gun works.
OPERATION
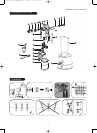
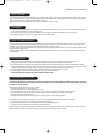
The gun has 3 different spray patterns – Horizontal, Vertical and Round (Fig.2). The horizontal and vertical are recommended for large surfaces. The
round spray is used for small objects or for areas - such as corners – that are difficult to reach. To change the spray pattern simply rotate the Air Cap
(2) until it clicks into the positions as shown in (Fig.2). The overall size of the selected spray pattern can be varied by turning the Air Cap Ring (1). When
viewed from the front, rotate it clockwise to increase the pattern size, or anti-clockwise to reduce the pattern size.
SPRAY PATTERNS
Your Spray Station can be used with a wide variety of paints, stains and coatings such as latex, deck and fence stain, sealers, varnishes, wood
preservatives, enamels, oil and water-based paints and automotive paints.
However, some materials cannot be sprayed so please check the recommendation of the manufacturer before buying the paint. If a material refers to
brush application only then it usually cannot be sprayed.
THIS UNIT CANNOT BE USED FOR TEXTURED PAINTS. USE OF THESE MATERIALS WILL CAUSE PREMATURE WEAR, WHICH WILL VOID
YOUR WARRANTY. TO OBTAIN THE BEST RESULTS FROM YOUR SPRAY STATION, PLEASE READ THE INSTRUCTIONS CAREFULLY
BEFORE USE.
IMPORTANT: SELECTING PAINT
L1325_5500_0311.qxd:Layout 2 7/3/11 17:00 Page 6