


7
Questions? Call toll free: 888-783-2612
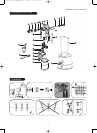
1. To obtain the best results always keep your spray gun level and spray equally from side to side or up or down from the surface. Avoid spraying
at an angle as this will lead to runs on the surface (Fig.5-7).
2. Let your arm control the left to right movement rather than your wrist as this will aid even paint distribution over the whole area.
3. Do not tip the spray gun to more than a 45˚ angle when the motor is switched OFF.
The volume of paint sprayed is easily adjustable (Fig.3). Completely close adjusting screw (12) by turning this clockwise as far as it will go. While
pulling the Operating Lever (25), begin turning the adjusting screw anti-clockwise until the volume of paint you require is obtained. If the paint spray
contains too much paint turn the adjusting screw clockwise to reduce it.
Once you have set the spray pattern and the paint volume, you are ready to begin spraying.
TECHNIQUE
PAINT VOLUME
1. Evenly control the speed of movement of the spray gun. A fast speed will give a thin coat and a slow speed will give a heavy coat.
2. Only apply one coat at a time. If a further coat is required follow the paint manufacturerʼs instructions for drying times.
3. If spraying small areas or objects keep the adjusting screw setting low as this will avoid excessive use of paints and will minimise overspray.
4. When spraying large areas or objects, it is best to use a criss-cross pattern, either from left to right then up or down or vice-versa. This will ensure
maximum coverage. Let go of the trigger at the end of each spray movement to avoid excessive paint and drips (Fig.4).
5. Avoid stopping and starting when spraying as this can lead to too much or not enough material on a surface.
6. To ensure edges are covered, commence spraying just to the side of area being sprayed.
7. CLEAN SPRAY GUN AFTER EVERY USE (SEE CLEANING INSTRUCTIONS).
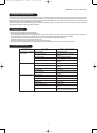
Paints, varnishes, wood treatments etc, are manufactured using a variety of materials and have widely different viscosities. You may find that the
0.08” (2.0mm) dia Fluid Tip and Needle supplied with this spray gun does not enable you to spray your particular choice of finish exactly as you
would like. In such cases a change of fluid tip and needle size will probably solve this problem.
In general, thicker, more viscose materials are best sprayed through a larger fluid tip to give best coverage. Thinner, less viscose materials are best
sprayed through a smaller fluid tip.
To allow for these variations fluid tip and needle sets are available, as optional extras, in 0.04” (1.0mm) dia, 0.06” (1.5mm) dia and 0.10” (2.5mm)
dia (See page 5).
FLUID TIPS AND NEEDLES
CLEANING INSTRUCTIONS
HELPFUL HINTS
THE SPRAY GUN SHOULD BE THOROUGHLY CLEANED AND THE GLAND WASHERS LUBRICATED, IMMEDIATELY AFTER EACH USE. IF
THE PAINT DRIES INSIDE THE GUN CLEANING WILL BE MUCH MORE DIFFICULT AND MAY RENDER THE GUN INOPERABLE. THIS IS NOT
COVERED BY THE GUARANTEE.
Flush out the residue paint from the spray gun, as follows:
●
Remove the paint container (17) from the spray gun.
●
Pour any residual paint into its original container for future use.
●
Use a cloth soaked in thinners to wipe out excess paint from the container, the underside of the lid (20) and the gasket (19).
●
Pour a small quantity of clean thinners into the container, re-fit the container to the spray gun and shake the gun lightly.
●
Now spray all of the thinners through the gun.
●
Repeat this, each time using clean thinners, until there is no trace of paint in the thinners being sprayed.
To thoroughly clean the remainder of the spray gun, remove all working parts as per the exploded parts view on p.3 as follows.
●
Loosen and remove air cap ring (1), air cap (2) and air distributor plate assy (3).
●
Now unscrew the adjusting screw (12) and pull out the fluid needle (9) and needle spring (11).
●
Using the spanner (27) supplied remove the fluid tip (4) and fluid tip seal (5).
After cleaning your spray gun and before fitting the needle, dip the tip into some petroleum jelly which will lubricate the gland washers (16) as the
needle is inserted. The external surfaces of the spray gun can be wiped clean with a cloth soaked in thinners.
L1325_5500_0311.qxd:Layout 2 7/3/11 17:00 Page 7