


22
ENGLISH
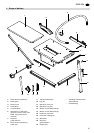
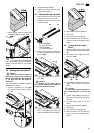
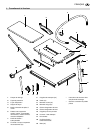
Accessory holder installation
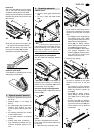
In a final assembly step two screw hooks
are installed on the sides of the front
legs to serve as accessory holder:
1. Turn one each hexagon nut (91)
about 10 mm up the thread of the
screw hook (92).
2. Put a washer (93) on the screw
hook.
3. Put hook through the hole provided
in the leg and secure with one each
washer (93) and hexagon nut (91).
Tightening the screwed connections
• Check all screwed connections of
the saw. Tighten all screwed con-
nections hand-tight with a suitable
tool.
7.1 Mains connection
B
Danger! High voltage
• Operate this machine in dry sur-
roundings only.
• Operate the machine only on a
power source meeting the follow-
ing requirements (see also "Tech-
nical specifications"):
− outlets properly installed,
earthed, and tested.
− mains voltage and system fre-
quency conform to the voltage
and frequency shown on the
machine´s rating label;
− fuse protection by a residual
current operated device (RCD)
of 30 mA sensitivity;
− System impedance Z
max
at the
interconnection point (house
service connection) 0.35 Ohm
maximum.
3
Note:
Check with your local Electricity
Board or electrician if in doubt whether
your house service connection meets
these requirements.
• Position power supply cable so it
does not interfere with the work
and is not damaged.
• Protect power supply cable from
heat, aggressive liquids and
sharp edges.
• Use only rubber-jacketed exten-
sion cables with sufficient lead
cross-section (see "Technical
specifications").
• Do not pull on power supply
cable to unplug.
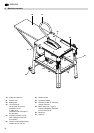
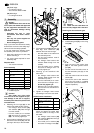
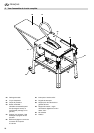
7.2 Installation
• Place the machine on a firm, level
floor.
• Ensure there is sufficient space to
handle larger workpieces.
For maximum upright stability the saw
can be bolted to the floor:
1. Place the fully assembled saw at a
suitable site and mark the bore
holes on the floor.
2. Move saw aside and drill the holes.
3. Align saw with the holes and bolt to
the floor.
A
Risk of injury!
This saw may only be operated
by one person at a time. Other per-
sons shall stay only at a distance to
the saw for the purpose of feeding or
removing stock.
Before starting work, check to see
that the following are in proper work-
ing order:
− power cable and plug;
− ON/OFF switch
− riving knife
− blade guard
− feeding aids (push stick, push
block and handle).
Use personal protection gear:
− dust respirator;
− hearing protection;
− safety goggles.
Assume proper operating position:
− at the front of the saw;
− in front of the saw;
− to the left of the line of cut;
− when working with two persons,
the other person must remain at
an adequate distance to the saw.
If the type of work requires, use the
following:
− suitable workpiece supports – if
otherwise workpiece would fall
off the table after cutting;
− dust collector.
Avoid typical operator mistakes:
− Do not attempt to stop the saw
blade by pushing the workpiece
against its side. Risk of kickback.
− Always hold the workpiece down
on the table and do not jam it.
Risk of kickback.
− Never cut several workpieces at
the same time – and also no bun-
dles containing several individual
pieces. Risk of personal injury if
individual pieces are caught by
the saw blade uncontrolled.
C
Drawing-in/trapping hazard!
Never cut stock to which
ropes, cords, strings, cables or wires
are attached or which contain such
materials.
8.1 Dust collector
A
Danger!
Dust of certain timber species
(e.g. beech, oak, ash) can cause can-
cer when inhaled. Use a suitable dust
collector when working in enclosed
spaces. The dust collector must meet
the following requirements:
− hoses must fit the outer diameter
of the dust extraction ports (blade
guard 38 mm; chip case 100 mm);
− air flow volume
≥ 460 m
3
/h;
− vacuum at dust extraction port of
saw
≥ 530 Pa;
− air speed at dust extraction port
of saw ≥ 20 m/ s.
The dust extraction ports are located at
the chip case assembly and at the saw
blade guard.
Observe the dust collector's operating
instructions as well!
Operation without a dust collector is only
possible:
− outdoors;
− for short-term operation
(up to a maximum of 30 minutes);
− with dust respirator.
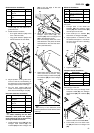
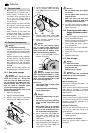
8.2 Setting the depth of cut
A
Danger!
Parts of the body or objects in
the setting range can be caught by
the running saw blade! Set the depth
of cut only with the saw blade at
standstill!
The saw blade's cutting height needs to
be adapted the the height of the work-
piece: the blade guard shall rest with its
front edge on the workpiece.
Item Description Qty.
91
Hexagon nut M6
4
92 Screw hook M6
2
93 Washer 6.4
4
91
92
93
8. Operation