


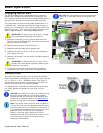

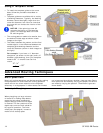

Fixed Depth Using the Turret Latch
The turret latch can be used during fixed depth routing
to provide an easy means for making small incremental
changes in routing depth. An example of this is for
inlaying a component or other piece of wood into a
substrate wood, where the inlay needs to be perfectly
flush with the substrate surface. The depth of the cut
can be finely adjusted and the component test-fitted
between passes (refer to the example on page 16).
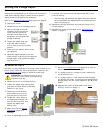
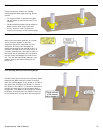
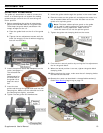
Plunge Routing
Plunge routing is any operation where the router is
lowered down into the cutting area after the router has
been started. Most often this involves router bits that do
not have a guide bearing, but can also be used for
interior cutting (such as the circular cut shown on page
12).
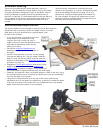
1. Verify that the router bit is properly secured and the
router is ready for operation.
2. Secure the workpiece to a stable surface.
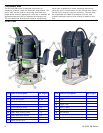
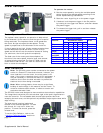
3. Set the router speed according to the speed settings
table on page 7.
4. With the router turned off, place the router on the
workpiece.
5. Firmly grasp both handles of the router and pull in on
the power trigger switch.
6. Lower the router to the desired depth, tighten the
plunge lock knob, and advance the router through
the cut.
Note: Failure to tighten the plunge lock knob may
result in the router depth rising unexpectedly.
► For router bits with
guide bearings, advance
the router through the
cut according to the feed direction rules discussed on
page 12.
► When using router bits without a guide bearing, or with an
external guide rail, follow the tips in "plough cuts" below
to keep the router tracking properly.
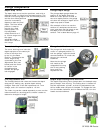
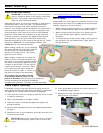
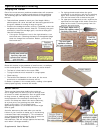
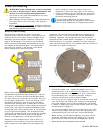
Plough Cuts
When making plough cuts, as shown to the right,
three sides of the router bit are engaging the
workpiece. This can lead to undesired changes in
the path of the router.
► One side of the router bit is climb-cutting, and
this tends to propel the router forward.
► One side of the router bit is push-cutting, and
this tends to slow the feed rate.
► The leading edge of the router bit pushes the
router sideways, opposite the rotation of the
bit.
The opposing climb-cutting and push-cutting
sides of the cut tend to cancel each other out, but
may cause the router to advance with a jerking
motion.
To avoid drift from the leading edge of the router
bit, position the guide on the push-cutting side of
the router (toward the middle in the image to the
right).
Supplemental User’s Manual 13