


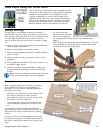
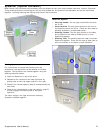

Precision Routing
There are many applications where precision routing is
required, such as template routing, dados, fluting, and inlays.
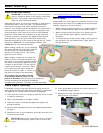
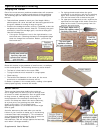
Inlaying a secondary component, such as hardware, into an
existing substrate is typically where the greatest level of
precision is required. In the example below, both the width of
cut and depth of cut need to be precisely controlled for the
component to fit tightly into the dado and flush with the
surface.
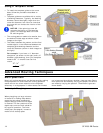
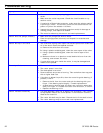
There are many methods for controlling the size
(width in this example) of a cutout. A template system
such as the MFS guide (shown on page 13) is very
effective for making multiple copies of the same cut.
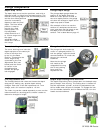
For this example, the guide rail attachment is used
because it permits fine adjustment to ease the cut to
the exact size through test-fitting.
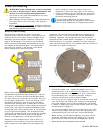
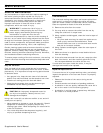
Hardware Inlay Example using the Turret Latch
The primary basis for this example is using the turret latch and fine
adjustment dial to precisely control the depth of cut for a multi-
pass dado to inlay a component at a precise depth, such
as flush to the surface.
► If you do not have a router bit that is the
exact width of the component to be
inlayed, then use a router bit that is
slightly narrower than the desired final cut,
and make progressively wider cuts by
shifting the router.
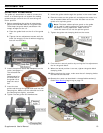
► Set up the Guide Rail Attachment as
described on page 19, and also shown to
the right.
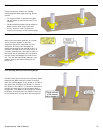
► Set the router position so the bit is cutting along
one side the desired cut. You can make a shallow
pass to verify the initial position and fine-tune the
position as described in the
Guide Rail Attachment
procedure on page 19.
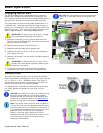
► Engage the Turret Latching Lever and set the initial
depth of the bit as described in the Setting the
Plunge Depth
procedure on page 10, but make sure
the initial depth is slightly shallower than the final depth.
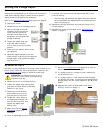
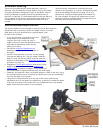
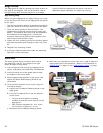
► Gradually increase the router’s horizontal position (width of the cut) using
the fine adjustment dial on the guide rail attachment until the component
fits into the width of the cutout.
16 OF 2200 EB Router
► Using the fine adjustment dial on the top of the router and the fine
adjustment dial on the guide rail attachment, gradually increase the depth
of the cut and clean up the width until the component fits to the desired
depth (flush with the surface in this example).