


12
3.3 Chips extraction
Particularly for work in closed areas, we recommend that you
connect your circular saw to a chip extractor. This will enable
you to reduce the dust load in the air, ensuring that your
workplace is clean and improving the quality of your work.
For the connection of a chip extractor, the circular saw has a
suction connection piece (4.3), which can be connected to a
suction hose (4.1) with a diameter of 27 mm.
If no chip extractor is connected, it is essential that the chip
guard supplied (4.2) is fitted to the connection piece. The
chip trajectory can be altered by turning the chip guard as
required. This prevents the operator being subjected to a
stream of chips, always providing that the chip guard is
adjusted so that the chip trajectory is directed away from the
operator.
3.4 Changing the saw blade
Check regularly whether the saw blade is in good
condition. Saw blades which are cracked or have changed
shape should no longer be used, but changed immediately!
When selecting the saw blades it is essential that the following
points are observed:
- Do not use saw blades made of high alloy high speed steel
(HSS circular saws), as otherwise there is a great danger of
recoil.
- Use only saw blades that have an outside diameter of 180
to 192 mm.
- The bore diameter of the saw blade holder should be 30
mm.
- Use only saw blades with a fundamental thickness of max.
1.9 mm and a cutting width of 2.5 to 3.5 mm.
The AT 65 E was tested with Festool saw blades listed in the
Festool catalogue. For your own safety, we recommend that
you use only those saw blades.
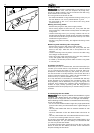
To change the saw blade, place the circular saw on the saw
bench so that the saw blade protrudes a few millimetres
beyond the edge of the bench.
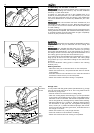
3.2 Riving kniff
The AT 65 E is fitted with a riving knife (3.2) as
standard. All saw work, with the exception of plunge cuts,
should, for safety reasons, only be carried out with the riving
knife installed and correctly set!
The riving knife must be set so that
- the distance between riving knife and cutting circle (3.3) of
the saw blade is 2 to 4 mm (measurement x), and
- the saw blade is set 2 to 4 mm above the riving knife
(measurement y).
Setting the riving knife:
- Remove the plug from the power supply socket.
- Set a cutting depth of about 50 mm, and press the saw
down to the stop. Hold the saw in this position for setting the
riving knife.
- Loosen the fixing screw (3.1) turning it about one turn to
the left with the hexagon socket wrench supplied. The safety
screw ensures that the riving knife does not drop out of the
machine during this action.
- Set the riving knife correctly, and tighten the fixing screw
up again.
Removing and installing the riving knife:
- Remove the plug from the power supply socket.
- Set a cutting depth of about 50 mm, and press the saw
down to the stop. Hold the saw in this position for the
removal.
- Loosen the fixing screw by about 2 turns to the left using
the hexagon socket wrench.
- Draw the riving knife downwards out from the protective
cover, and tighten the fixing screw again.
- To install it, reverse the process. Make sure the riving knife
is correctly set!