


8
PROGRAMMING THE SYSTEM
For the system to operate properly the vehicle suspension travel will need to be programmed into the ECU.
Reconnect the negative terminal on the battery.
Step 1: Programming Setup
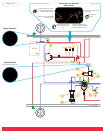
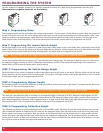
Plug the program switch into the wire harness that is labeled program switch. Turn the system off using the service switch. When the system is off
the side of the switch will be red. Turn on the vehicle’s ignition and leave it on until the entire programming of the vehicle’s heights is done. There
should be no lights on the height selection switch at this time. Push the program switch three times within six seconds. The lower light on the
height selection switch should start blinking. This will be indicating that jounce height (lowest) needs to be programmed into the ECU.
Step 2: Programming the Lowest Vehicle Height
Set the lowest height of your vehicle’s suspension by either using inflation valves at each corner or jack stands. Note: Lowest height cannot be fully
deflated. When all four corners of the vehicle are at the jounce height that you determine, hold the program switch in for eight seconds. Both lights
on the height selection switch should start blinking indicating that the ride height needs to be programmed into the ECU.
The full jounce position should be a minimum of 1/4” from where the jounce bumper stops. This small gap is required to allow for a tolerance as
the suspension height is controlled by the ECU. Without this small tolerance, the ECU will not achieve the lowered height if the suspension is
stopped before the ECU believes the lowest vehicle height is reached.
STEP 3: Programming the Vehicle Design Height
Set the ride height of your vehicle’s suspension by either using inflation valves at each corner or jack stands. When the vehicle is at the ride height
that you determine, hold the program switch for eight seconds. The top light on the height selection switch should start blinking. This will indicate
that the highest height needs to be programmed into the ECU.
STEP 4: Programming Highest Height
Set the highest height of your vehicle’s suspension by either using inflation valves at each corner or jack stands. The rebound position should be a
minimum of 1/2” from where the rebound stops.
This small gap is also required to allow for a tolerance as the suspension height is controlled by the ECU. Without this small tolerance, the ECU
may not achieve the highest height if the suspension is stopped before the ECU believes the highest vehicle height is reached. When the vehicle is
at the rebound height that you determine, hold the program switch in for eight seconds. Both lights on the height selection switch should start
blinking back and forth. This will indicate that the calibration height needs to be programmed into the ECU.
STEP 5: Programming Calibration Height
This calibration step teaches the relative suspension reaction to the IntelliRide system. Specifically this sets the internal tolerance bands and pro-
vides a relationship between the voltage that the ECU reads and the suspension height. Lower the height of each corner one inch by either using
inflation valves at each corner or jack stands. When the vehicle is at the calibration height, hold the program switch for eight seconds, and then
release. Both lights in the height selection switch should be on at the completion of programming. Turn off the vehicle’s ignition, and switch the
service switch so that it is all black and not showing red. After the proper airlines are installed and the vehicle’s ignition is turned back on, the sys-
tem will put the vehicle at standard ride height and pressurized the air tank.
Note: Highest height cannot be fully extended, as this will generate a rough ride and may damage the dampers.
Note: When you choose your jounce height, ensure there is a small gap between travel stops and suspension.
Lowered HeightStandard HeightRaised Height