


15
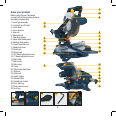
2. Loosen the mitre locks (18).
3. Rotate the mitre table (16) until the pointer aligns
with the desired angle on the mitre scale (17).
4. Retighten the mitre locks (18).
WARNING. Be sure to tighten the mitre locks before making
a cut. Failure to do so could result in the table moving
during the cut, causing serious personal injury.
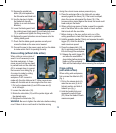
5. Loosen the bevel lock (12) and move the saw arm (5) to
the left to the desired bevel angle (between 0º and 45º).
Tighten the bevel lock (12).
6. Place the workpiece flat on the table with one edge
securely against the fence (19). If the board is warped,
place the convex side against the fence. If the concave
side is placed against the fence, the board could break
and jam the blade.
7. When cutting long pieces of timber, support the opposite
end of the timber with a roller stand.
8. Before turning on the saw, perform a dry run of the
cutting operation to check that there are no problems.
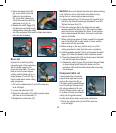
9. Hold the operating handle (7) firmly and squeeze the switch
trigger (23). Allow the blade to reach maximum speed.
10. Press the release latch (24) and slowly lower the blade
into and through the workpiece.
11. Release the switch trigger (23) and allow the saw blade
to stop rotating before raising the blade out of the
workpiece. Wait until the blade stops before removing
the workpiece.
Using the laser line generator
WARNINGS.
Do not stare directly at the laser beam.
Never aim the beam at any person or an object other than
the workpiece.
Do not deliberately aim the beam at personnel and ensure
that it is not directed towards the eye of a person for longer
than 0.25s.
Always ensure the laser beam is aimed at a sturdy
workpiece without reflective surfaces. Wood or rough coated
surfaces are acceptable. Bright shiny reflective surfaces
are not suitable for laser use as the reflective surface could
direct the beam back at the operator.
Always remember to switch off the laser on/off switch (2)
after finishing a job. Only turn the laser beam on when the
workpiece is on the mitre saw table.
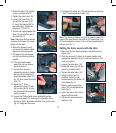
1. Mark the line of the cut on the workpiece.
2. Adjust the angle of mitre and bevel of the cut as required.
3. Switch on the laser light on/off switch (2).
4. Clamp the workpiece in position using the laser line to
align the blade with the pencil mark on the workpiece.
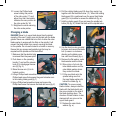
5. Plug in the machine and start the motor.
6. Press the release latch (24).
7. When the blade is at its maximum speed (approximately
2 seconds), lower the blade through the workpiece.
8. After completing the cut, switch off the laser light
on/off switch (2).
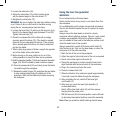
9. After each use, clean the laser light assembly (1)
as described below:
• Switch off the laser light switch (2) and then remove
the plug from the power point.
• With the saw arm (5) in the raised position, use a soft brush
to dust away the sawdust build-up around the assembly.
Note. Wear eye protection whilst brushing the dust away.