


Troubleshooting
12 309977H
ELECTRICAL SHORT
TYPE OF PROBLEM
WHAT TO CHECK
If check is OK, go to next check
WHAT TO DO
When check is not OK, refer to this column
Building circuit breaker
opens as soon as sprayer
switch is turned on.
CAUTION
Any short in any part of the
motor power circuit will
cause the control circuit to
inhibit sprayer operation.
Correctly diagnose and
repair all shorts before
checking and replacing con-
trol board.
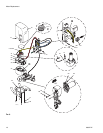
1. All electrical wiring for damaged
insulation, and all terminals for
loose fit or damage. Also wires
between pressure control and
motor. See page 15.
1. Repair or replace any damaged wiring or
terminals. Securely reconnect all wires.
2. Bent terminal folks or other metal
to metal contact points which
could cause a short.
2. Correct faulty conditions.
3. Motor armature for shorts. Use
an armature tester (growler) or
perform spin test. See page 14.
Inspect windings for burns.
3. Replace motor. See page 15.
4. Motor control board (38) by per-
forming motor control board diag-
nostics on page 17. If diagnostics
indicate, substitute with a good
board.
CAUTION: Do not perform this
check until motor armature is
determined to be good. A bad
motor armature can burn out a
good board.
4. Replace with a new pressure control
board (38). See page 17.
Building circuit breaker
opens as soon as sprayer is
plugged into outlet and
sprayer is NOT turned on.
1. Basic Electrical Problems on
page 8.
1. Perform necessary procedures.
2. For damaged or pinched wires in
pressure control. See page 17.
2. Replace damaged parts. See page 17.
Sprayer quits after sprayer
operates for 5 to 10 minutes.
1. Basic Electrical Problems on
page 8.
1. Perform necessary procedures.
2. Electrical supply with volt meter.
Meter must read:
210-255 Vac for 220-240 Vac
models;
85-130 Vac for 100-120 Vac mod-
els.
2. If voltage is too high, do not operate
sprayer until corrected.
3. Tightness of pump packing nut.
Over tightening tightens packings
on rod, restricts pump action,
and damages packings.
3. Loosen packing nut. Check for leaking
around throat. Replace pump packings, if
necessary. See page 20.