


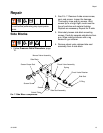


Repair
311322K 21
Trigger/Air Valve
1. Follow Pressure Relief Procedure, page
12.
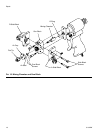
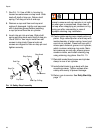
2. Use a 5/16 in. nut driver to alternately
loosen side block mounting screws. Care-
fully separate side blocks from gun. Wipe
mating surfaces with a rag soaked in gun
cleaner.
3. If gun is configured with air inlet at base of
handle (standard), remove 1/8 npt pipe
plug at rear of gun.
If gun is configured with air inlet at rear,
remove air hose and nipple.
4. Remove screw and locknut holding trigger
lever in place. Remove trigger lever.
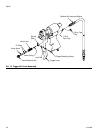
5. Remove valve retainer hex nut, which holds
brass valve spool in place.
6. Carefully grip end of valve spool with a pli-
ers and remove it. Valve spring, which fits
into spool, will come out with it. Be careful
not to lose spring.
7. Inspect spool o-rings and replace if dam-
aged. Liberally coat new o-rings with Lubri-
plate grease before installing.
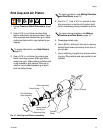
8. Remove 1/16 npt pipe plug from deep in
port at rear of gun.
9. Brass spring seat is visible inside port at
rear of gun. Use a 1/4 in. diameter (maxi-
mum) punch and hammer to gently tap
seat until valve liner and seat are pushed
out of valve cavity.
10.Inspect the four o-rings on valve liner and
replace if necessary. Apply Lubriplate
grease liberally to o-rings before installing.
11.Ensure that valve cavity is free of debris.
Apply a thin film of Lubriplate grease inside
cavity.
12.Slide spring seat into cavity, tapered end
first. Ensure it bottoms out in cavity.
13.There will be some resistance from the
o-rings when installing valve liner. Push
valve liner into cavity until 2 or 3 of the cav-
ity’s internal threads are visible.
14.Apply a small amount of thread sealant to
1/16 npt pipe plug and reinstall. This seals
threads to prevent air leaks.
15.Reinstall 1/8 npt pipe plug, or nipple and air
hose, at rear of gun.
16.Ensure that valve spring is in place, and
insert valve spool into valve liner. Screw in
valve retainer nut until snug. Do not over-
tighten.
17.Reinstall trigger lever, screw, and locknut.
18.Install side blocks to gun body with two
mounting screws. Tighten screws alter-
nately and evenly to prevent leakage.
19.Return gun to service. See Daily Start-Up,
page 11.
To repair side blocks, see Side Blocks,
page 13.
Threads allow engagement with valve
retainer nut, which aligns valve liner and
spool to proper depth.