


820-133 13
Maintenance
CAUTION
Thorough flushing and proper maintenance are
essential to keep the sprayer working properly
and
avoid costly damage to the sprayer or the ob
-
ject being sprayed.
Diaphragm Failure: Always replace the diaphragm
after
every 500 hours
of operation (once every 4 to 6
months). The diaphragm weakens with use. If the
diaphragm
ruptures, hydraulic oil and paint may mix,
damaging
the sprayer and/or the surface of the object
being
sprayed may be damaged.
Follow the Maintenance Intervals outlined below
.
Maintenance Intervals
Flushing Immediately
after each use.
Lubricate the intake valve.
Immediately after each use.
Tighten the paint pump
screws
and the inlet valve.
1.
After
the first 3 to 5 hours of
operation.
2. After the next 3 to 5 hours
of
operation.
3. Each 25 hours thereafter
(about weekly).
Check
or
change the hydrau
-
lic
oil.
1. Check the oil after each
use
of the sprayer
.
2.
Change the oil after the first
20
hours of operation.
3. Change the oil each 50
hours
thereafter (about twice
monthly).
Replace the diaphragm.
After every 500 gallons of
paint
sprayed (4 to 6 months).
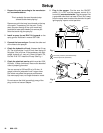
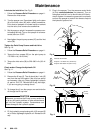
Flushing Procedure
1. Shut off the sprayer. Lock the gun trigger safety le-
ver.
Open the bypass valve ONE turn
counterclock-
wise.
Raise the
paint pump just above the paint and
turn
on the sprayer to drain the paint. Now turn of
f the
sprayer.
See Fig. 7.
2. Place the paint pump in a grounded flushing pail of
solvent.
3. Check to be sure the trigger safety lever is set. Re-
move the spray tip from the gun. Unlock the safety
lever. Hold a metal part of the gun firmly to the side
of a grounded metal pail. Close the bypass valve.
Trigger the gun into the pail. Turn on the sprayer.
Watch
the side of the pail for solvent to appear
. Then
release
the gun trigger
. T
urn of
f the sprayer
.
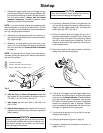
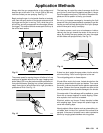
4. With the bypass valve closed, turn on the sprayer,
trigger
the
gun into the flushing pail and allow the sol
-
vent
to circulate through the hose and gun for two to
three minutes, using the lowest possible pressure.
See
Fig.
8. Release the gun trigger and lock the safe
-
ty
lever
. T
urn of
f the sprayer
.
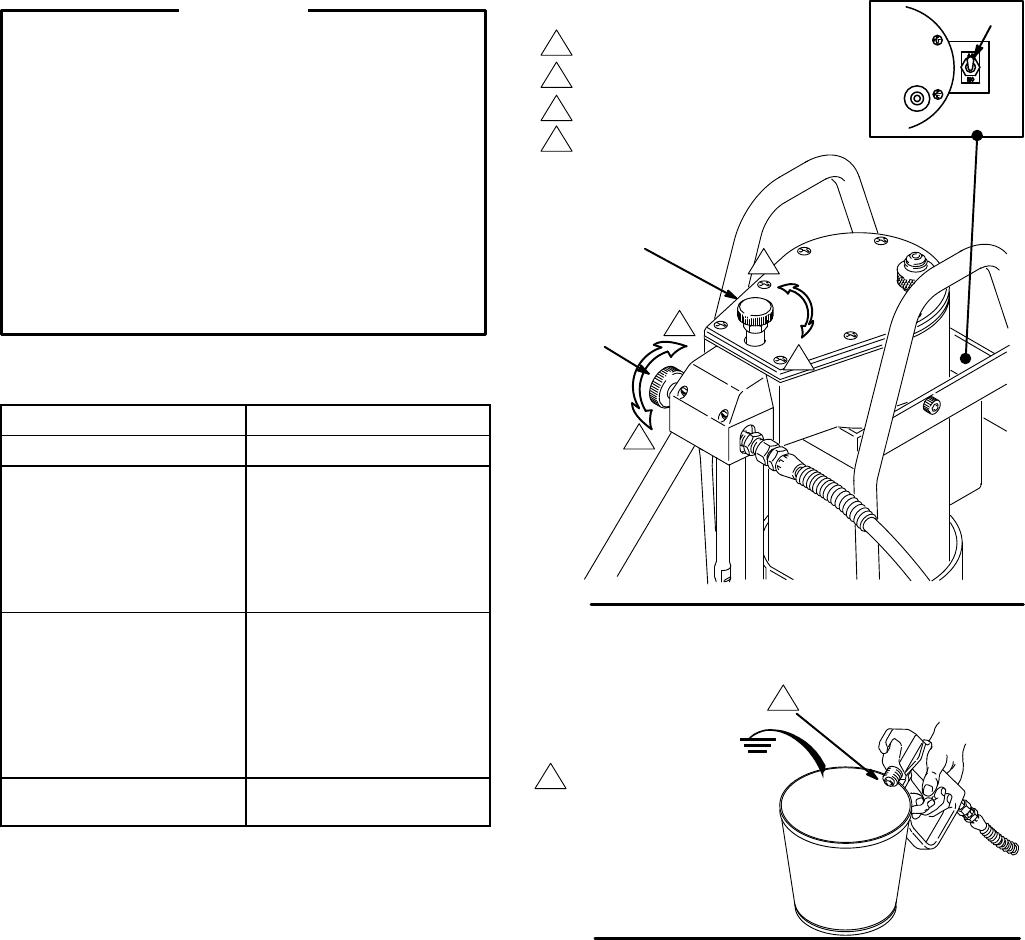
Fig. 7
0275
0270
1
3
4
2
Decrease
pressure
(counterclockwise).
Increase pressure (clockwise).
Open (counterclockwise).
Close (clockwise).
66
4
1
3
4
2
11
Maintain firm met
-
al–to–metal
contact
between
gun and
container
Fig.
8
0276
1
1
5. Open the bypass valve (66) ONE turn counter-
clockwise.
6. Raise
the paint pump above the solvent,
turn on the
sprayer,
and allow the pump to run itself dry
. T
urn the
sprayer OFF.
7. Using
a
clean pail of water or solvent, and the lowest
possible
pressure, flush again to be sure all paint par
-
ticles
are removed.
8.
Remove the paint strainer and clean it thoroughly
.
9.
Now lubricate the inlet valve. See page 14.
maintenance procedure continued on next page