


8 306706
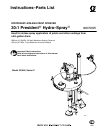
Operation/Maintenance
Pressure Relief Procedure
SKIN INJECTION HAZARD
The system pressure must be manually
relieved to prevent the system from
starting or spraying accidentally. Fluid
under high pressure can be injected through the
skin and cause serious injury. To reduce the risk of
an injury from injection, splashing fluid, or moving
parts, follow the Pressure Relief Procedure
whenever you
D Are instructed to relieve the pressure
D Stop spraying
D Check or service any of the system equipment
D Install or clean the spray tips
WARNING
1. Lock the gun trigger safety.
2. Shut off the air supply to the pump.
3. Close the bleed-type master air valve (required in
your system).
4. Unlock the gun trigger safety.
5. Hold a metal part of the gun firmly to the side of a
grounded metal pail, and trigger the gun to relieve
pressure.
6. Lock the gun trigger safety.
7. Open the drain valve (required in your system),
and have a container ready to catch the drainage.
8. Leave the drain valve open until you are ready to
spray again.
If you suspect that the spray tip or hose is completely
clogged, or that pressure has not been fully relieved
after following the steps above, very slowly loosen the
tip guard retaining nut or hose end coupling and relieve
the pressure gradually. Then loosen it completely.
Then clear the tip or hose.
Flushing the Pump
FIRE AND EXPLOSION HAZARD
Before flushing, read the section FIRE
AND EXPLOSION HAZARD on page
5. Be sure the entire system and flush-
ing pails are properly grounded. Refer
to Grounding on page 6.
WARNING
Flush the pump before first use. The pump is
tested with lightweight oil, which is left in to protect the
pump parts. If the fluid you are using may be contami-
nated by the oil, flush it out with a compatible solvent.
WARNING
To reduce the risk of serious injury whenever you
are instructed to relieve pressure, always follow the
Pressure Relief Procedure at left.
To flush the pump, do the following procedure:
1. Relieve the pressure.
2. Remove the spray tip from the gun.
3. Hold a metal part of the gun firmly to the side of a
grounded metal pail.
4. Start the pump. Always use the lowest possible
fluid pressure when flushing.
5. Trigger the gun.
6. Flush the system until clear solvent flows from the
gun.
7. Relieve the pressure.
CAUTION
Never leave water or water-based fluid in the pump
overnight. First, flush with water or a compatible
solvent, then with mineral spirits. Relieve the
pressure, but leave the mineral spirits in the pump
to protect the parts from corrosion.
Adjusting the Unit
You must adjust the elevator to ensure that the cover
is supported by the drum.
Shortened or recycled drums may cause the pump
or agitator to bottom out in the drum, causing
damage. Contact your fluid supplier to order a
standard size drum.
CAUTION
NOTE: The 100-mesh intake screen (9) should be
replaced by the coarser 50-mesh screen when using
large-orifice spray tips.
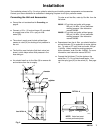
1. Connect the air supply. Raise the elevator by
pulling out the knob of the elevator’s push/pull air
valve.
2. Place a drum of fluid under the cover, against the
elevator base.