


306706 9
Operation/Maintenance
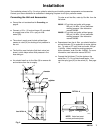
3. Push in on the air valve knob to lower the elevator,
so the cover (A) rests on the top lip of the drum.
The support clamp (K) recesses must be tight
against the elevator riser tube. The pump intake
valve feet (B) must contact and support the perfo-
rated plate (9) as shown in Fig. 2.
4. Raise the elevator 1/4” (6.4 mm), then tighten the
support clamp screws. This ensures that the
cover rests on the drum lip when the elevator is in
the lowered position.
5. Adjust the restrictor valve screw to control the
speed of raising and lowering the unit. Turn the
restrictor screw clockwise to decrease the air
pressure and counterclockwise to increase air
pressure to the elevator. Lock the screw’s position
with the locknut when the adjustment is completed.
6. Unscrew the filter bowl and remove the filter
screen. Replace the bowl. Flush the unit until
clear solvent comes from the gun, then reinstall
the filter screen.
7. Before operation, ensure that all fasteners and
tube connections are tightened securely.
Starting and Adjusting the Pump
1. Lower the pump into the fluid supply drum.
2. Close the air regulator (F).
3. Open the pump’s bleed-type master air valve (E).
4. Hold a metal part of the gun (S) firmly to the side
of a grounded metal pail and hold the trigger open.
5. Slowly open the regulator until the pump starts.
6. Cycle the pump slowly until all air is pushed out
and the pump and hoses are fully primed.
7. Release the gun trigger and lock the trigger safety.
The pump should stall against pressure.
8. If the pump fails to prime properly, open the drain
valve (M). Use the drain valve as a priming valve
until the fluid flows from the valve. Close the
valve.
NOTE: When changing fluid containers with the hose
and gun already primed, open the drain valve (M) to
help prime the pump and vent air before it enters the
hose. Close the drain valve when all air is eliminated.
CAUTION
Do not allow the pump to run dry. It will quickly
accelerate to a high speed, causing damage. If
your pump is running too fast, stop it immediately
and check the fluid supply. If the container is
empty and air has been pumped into the lines, refill
the container and prime the pump and the lines, or
flush and leave it filled with a compatible solvent.
Eliminate all air from the fluid system.
9. With the pump and lines primed, and with ade-
quate air pressure and volume supplied, the pump
will start and stop as you open and close the gun.
In a circulating system, the pump will speed up or
slow down on demand, until the air supply is shut
off.
COMPONENT RUPTURE HAZARD
To reduce the risk of overpressurizing
your system, which could cause compo-
nent rupture and serious injury, never
exceed the specified Maximum Incoming Air Pres-
sure to the pump. (see Technical Data on
page 13.)
WARNING
10. Use the air regulator (F) to control pump speed
and fluid pressure. Always use the lowest air
pressure necessary to get the desired results.
Higher pressures cause premature tip and pump
wear.
Shutdown and Care of the Pump
WARNING
To reduce the risk of serious injury whenever you
are instructed to relieve pressure, always follow the
Pressure Relief Procedure on page 8.
For overnight shutdown, stop the pump at the bottom
of its stroke to prevent fluid from drying on the ex-
posed displacement rod and damaging the throat
packings. Relieve the pressure.
Always flush the pump before the fluid dries on the
displacement rod. See Flushing on page 8.