


6 308846
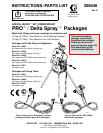
Operation
Using the Gun
See the gun instruction manual for gun operation,
care, flushing, cleaning, and technical data. Read the
entire gun manual before operating the sprayer.
Pressure Relief Procedure
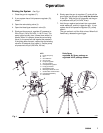
See Fig. 1
The system remains pressurized until pressure is
manually relieved. To reduce the risk of serious
injury from pressurized fluid, accidental spray from
the gun, or splashing of any fluid, follow this proce-
dure whenever you
D Stop spraying
D Are instructed to relieve pressure
D Check or service any system equipment
D Install, clean, or change spray nozzles
WARNING
1. Turn off the air supply to the pump.
2. Be sure the pump air regulator is open by turning
the knob (E) clockwise several turns.
3. Open the bleed-type master air valve (K) to relieve
pump air pressure.
4. Trigger the gun (B) to relieve fluid pressure in the
hoses.
5. Open the recirculating valve (J) to relieve any fluid
pressure trapped in the system.
Adjusting Pump and Gun Air Regulators
See Fig. 1
NOTE: The pump air regulator knob (E) and gun air
regulator knob (F) have a locking feature. To unlock
the knobs, pull out on them. You will feel them click
out. To lock them at the desired setting, push them
back into the locked position.
Always adjust the pump air regulator (E) and gun air
regulator (F) slowly to prevent surging during startup.
Turn the knobs clockwise to increase pressure, and
counterclockwise to decrease air pressure.
1. Slowly adjust the pump air regulator (E), to set air
pressure to approximately 60 psi (413 kPa, 4 bar).
2. If your system has a fluid pressure regulator, turn
the fluid pressure regulator handle (G) to adjust
the fluid pressure to 40 to 60 psi ( 276 to 413 kPa,
2.8 to 4 bar).
3. Slowly open the gun air regulator (F), and pull the
gun trigger just enough to open only the air valve
in the gun. With the gun air triggered, set the gun
air pressure to 60 psi (413 kPa, 4 bar).
NOTE: Gun air pressure higher than 60 psi (413
kPa, 4 bar) will cause excessive overspray and
lowered efficiency.
4. If your system has a fluid pressure regulator (G),
fully trigger the gun, and fine tune the fluid
pressure to obtain the desired atomization.
Systems with Fluid Pressure Regulator
See Fig. 1
With the fluid pressure regulator (G), you can control
fluid pressure from the pump to the gun. For an
accurate setting, adjust the fluid regulator only when
the gun is triggered and fluid is flowing through the
regulator. Be sure the jam nut under the T–handle (G)
does not interfere with your adjustments. Tighten the
jam nut to lock in the setting, if desired.
1. To open the fluid regulator, which allows fluid to
flow, turn the T-hand clockwise.
2. To close the fluid regulator, which restricts or shuts
off the fluid flow, turn the T-handle
counterclockwise.
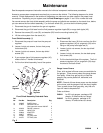
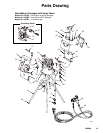
Systems with Surge Tank
See Parts Drawing on page 13
In systems with a surge tank (30), the fluid pressure is
the same as the air pressure applied to the pump
(pump has 1:1 ratio of fluid to air). Adjust the fluid
pressure as required with the pump air regulator (E).
The surge tank filter screen may require periodic
cleaning. First, relieve the pressure. Unscrew the
surge tank cover from its base, and remove the filter
screen. Clean the screen with a compatible solvent,
and reinstall it in the surge tank. Make sure you
reinstall the cover with a firm hand torque to ensure a
good seal.
WARNING
To reduce the risk of serious injury whenever you
are instructed to relieve pressure, always follow the
Pressure Relief Procedure on page 6.
NOTE: The pump requires approximately 15 to 20 psi
(103 to 138 kPa, 1 to 1.4 bar)to function. This is the
lowest fluid pressure available. If lower fluid flow is
required, a smaller fluid tip may be required on the
spray device.