


-24-
G0513X/G0514X/G0514X3 Extreme Series Bandsaw
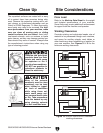
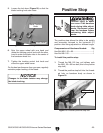
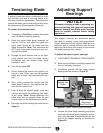
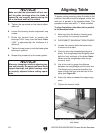
Figure 20. Squaring table to blade.
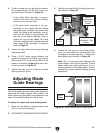
5. Adjust the positive stop bolt to the table and
secure it by tightening the hex nut against
the trunnion bracket.
6. Check the adjustment for accuracy once you
have tightened the hex nut.
7. Loosen the screw on the pointer, but do not
remove it.
8. Align the tip of the pointer with the 0˚ mark on
the table tilt scale.
9. Tighten the screw on the pointer so that the
pointer is locked in place.
To set the positive stop:
1. DISCONNECT BANDSAW FROM POWER!
2. Adjust the blade tension until the mark on the
blade tension scale is between 4 and 6.
3. Loosen the hex nut that locks the positive
stop bolt in place.
4. Raise the guide post and place a machinist’s
square on the table next to the side of the
blade as illustrated in
Figure 20. Adjust the
table square with the blade, then secure with
the table tilt knobs.
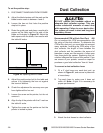
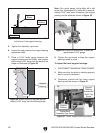
Figure 21. Dust hose attached to dust port.
Dust Collection
Recommended CFM at Each Dust Port: 400
Do not confuse this CFM recommendation with
the rating of the dust collector. To determine the
CFM at the dust port, you must take into account
many variables, including the CFM rating of the
dust collector, the length of hose between the
dust collector and the machine, the amount of
branches or wyes, and the amount of other open
lines throughout the system. Explaining this cal
-
culation is beyond the scope of this manual. If you
are unsure of your system, consult an expert or
purchase a good dust collection "how-to" book.
To connect a dust collection hose:
1. Fit a 4" dust hose over each dust port, as
shown in
Figure 21, and secure in place with
a hose clamp
.
2. Tug each hose to make sure it does not
come off.
Note: A tight fit is necessary for
proper performance.
DO NOT operate this bandsaw without an
adequate dust collection system. This saw
creates substantial amounts of wood dust
while operating. Failure to use a dust collec
-
tion system can result in short and long-term
respiratory illness.
3. Attach the dust hoses to a dust collector.