


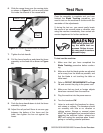
G0513X/G0514X/G0514X3 Extreme Series Bandsaw
-25-
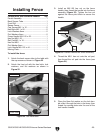
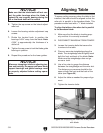
3. Install an M8-1.25 hex nut on the fence
handle, then thread the handle into the fence
assembly (
Figure 23). Tighten the hex nut
against the fence pivot block to secure the
handle.
Figure 23. Handle installed on fence assembly.
Hex
Nut
Pivot Block
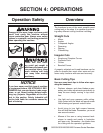
4. Thread the M6-1 hex nut onto the rail pad,
then thread the rail pad into the fence (see
Figure 24).
Components and Hardware Needed: Qty
Fence Assembly ................................................
1
Back Square Tube .............................................
1
Front Rail ..........................................................
1
Resaw Fence .....................................................
1
Cap Screws M6-1 x 16 ......................................
2
Hex Bolts M6-1 x 20 ..........................................
2
Lock Washers 6mm ...........................................
2
Flat Washers 6mm ............................................
2
Fence Handle M8-1.25 x 22 ..............................
1
Hex Nut M8-1.25 ...............................................
1
Rail Pad M6-1 x 18 ............................................
1
Hex Nut M6-1 ....................................................
1
Flat Washer 8mm ..............................................
1
Lock Handle M8-1.25 x 44 ................................ 1
Moving Plate ......................................................
1
To install the fence:
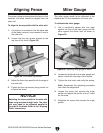
1. Attach the back square tube to the table with
the cap screws as shown in
Figure 22.
2. Attach the front rail with the hex bolts, lock
washers, and flat washers as shown in
Figure 22.
Installing Fence
Figure 22. Rail installation.
Figure 24. Installed rail pad.
5. Place the 8mm flat washer on the lock han-
dle, slide it through the hole in the fence, then
thread the moving plate onto the end of the
lock handle threads.
Rear View
Front View