


-34-
G0588/G0591 12" Sliding Table Saws
The Model G0588/G0591 will perform best when
high quality, sharp blades are used. Therefore,
whenever the blades start to get dull, we rec
-
ommend that you have them resharpened or
replaced with a new blade.
To change the blades:
1. Disconnect the saw from the power
source!
2. Move the blade tilt to 0˚ (blade 90˚ to table)
and raise the main blade as high as it will
go.
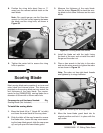
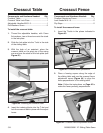
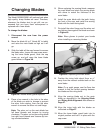
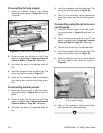
3. Slide the table all the way forward to access
the blade arbor, loosen the cap screw secur
-
ing the lower blade guard, slide the cap
screw up, and pull open the lower blade
guard shown in
Figure 48.
Changing Blades
Figure 48. Internal blade guard exposed.
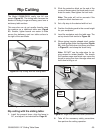
4. Place a hex wrench in the hole in the arbor
of the blade you wish to change to prevent
the arbor from rotating, then use the arbor
wrench to remove the arbor nut and flange.
Note: The arbor nut on the main blade has
left hand threads and loosens by turning
clockwise. The arbor nut on the scoring blade
has right hand threads and loosens by turn
-
ing counterclockwise.
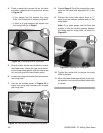
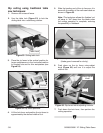
5. When replacing the scoring blade, measure
the main blade and stack the scoring blade
with shims to match the thickness of the
main blade
.
6. Install the main blade with the teeth facing
the front of the saw, and install the scoring
blade with the teeth facing back.
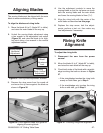
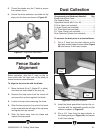
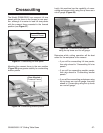
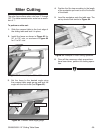
7. Re-install the arbor flange and the arbor nut
and tighten them against the blade as shown
in Figure 49.
Note: Wear gloves to protect your hands
when installing or removing blades.
8. Position the riving knife about 3mm or
1
⁄8"
away from the nearest carbide tooth on the
main blade.
Note: For a quick gauge, use the 3mm hex
wrench to find the correct spacing between
the blade and the riving knife.
9. Align the scoring blade set to the main
blade as described in the Aligning Blade
and Riving Knife Alignment instructions on
Page 27
.
10. Align the riving knife with the blades as
instructed on Page 27.
11. Move the lower blade guard back into its
original position and lock it in place with the
cap screw.
Figure 49. Replacing the main blade.