


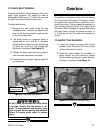

G1021Z 15" Planer -23-
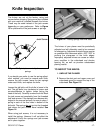
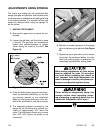
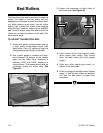
Figure 26. Roller pressure assembly.
Pressure Setscrew
Pressure Spring
Roller
Check Nut
Height Setscrew
4. Remove the springs that are in the holes
left by the setscrews. See Figure 26.
5. Check for any dirt or grit. Clean the springs
and setscrews if dirty.
6. Screw the three regular-pressure
setscrews back in until they are flush with
the top of the head casting.
7. Screw the light pressure setscrew until it is
approximately
1
⁄4" above the head casting.
The feed chain applies additional tension to
the right side of the outfeed roller, so the
pressure added by the setscrew need not
be as high.
To be effective, the infeed and outfeed rollers
must put pressure on the workpiece as it feeds
through the planer. Too little pressure results in
slipping boards, too much pressure results in
jamming.
Experiment with the best pressure settings for
your work situations. Some rough cut lumber will
feed through fine with relatively few problems,
while other lumber will have more difficulty.
Adjusting roller pressure does not affect height.
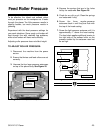
TO ADJUST ROLLER PRESSURE:
1. Disconnect the machine from the power
source.
2. Ensure that knives and feed rollers are set
correctly.
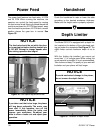
3. Unscrew the four large pressure setscrews
on top of the planer body. See Figure 25.
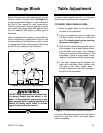
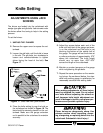
Feed Roller Pressure
Figure 25. Roller pressure adjustment.
Light Pressure
Setscrew
Regular
Pressure
Setscrews