


G1021Z 15" Planer -9-
Unpacking
The planer is shipped from the factory in a care-
fully packed crate. If you find the machine to be
damaged after you’ve signed for delivery and the
truck and driver are already gone, you will need to
file a freight claim with the carrier. Save the con-
tainers and all packing materials for inspection by
the carrier or their agent. Without the packing
materials, filing a freight claim can be difficult. If
you need advice regarding this situation, please
call us immediately.
The G1021Z is a heavy machine with a 540
lb. shipping weight. DO NOT over-exert
yourself while unpacking or moving your
machine – get assistance. In the event that
your planer must be moved up or down a
flight of stairs, be sure that the stairs are
capable of supporting the combined weight
of people and the machine. Failure to use
care while assembling or moving could
result in serious personal injury.
Parts Inventory
After all the parts have been removed from the
container, you should have:
Planer Unit on Stand
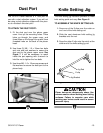
Dust Port
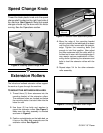
Roller Extensions (2)
Dust Port Mounting Hardware
Cap Screw M6 - 1.0 x 12 3
Lock Washer M6 3
Hex Bolts M6 - 1.0 x 12 3
Hex Nuts M6 - 1.0 3
Washers M6 6
Roller Extension Mounting Hardware Bag
Hex Bolts M8 -1.25 x 20 6
Flat Washers 8mm 6
Setscrews M8 - 1.25 x 12 6
Depth Handwheel Hardware
Handle 1
Hex Nut M10 - 1.25 1
Flat Washer 10mm 1
Scale (Hi - Lo) 1
Key 1
Knife Setting Jig
Knife Setting Jig Rod 1
Knife Setting Jig Brackets 2
E-clips 4
Tool Kit
Allen
®
Wrench 3mm 1
Allen
®
Wrench 4mm 1
Allen
®
Wrench 5mm 1
Allen
®
Wrench 6mm 1
Open End Wrench 8-10mm 1
Open End Wrench 12-14mm 1
In the event that any parts are missing, we will be
happy to replace them. Contact our Customer
Service number for assistance. If any non-propri-
etary parts such as nuts, bolts or washers are
missing, we will be happy to replace these too,
but for the sake of expediency, these items can
be obtained at your local hardware store.
NOTICE
A full parts list and breakdown can be
found toward the end of this manual. For
easier assembly, or to identify missing
parts, please refer to the detailed illustra-
tions at the end of the manual.