


-10- G1033 20" Planer
Dust Hood
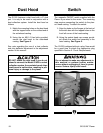
The G1033 features a dust hood with a 5'' dust
port. It is only to be used in conjunction with a
dust collection system. Install the dust hood as
follows:
1. Match the mounting holes on the dust hood
with the tapped holes on the outfeed end of
the cutterhead casting.
2. Using the six M6-1.0 Hex bolts provided,
secure the dust hood to the cutterhead
casting. See Figure 4.
See note regarding the use of a dust collector
and chip deflector adjustment in the adjustment
section of this manual.
Figure 4. Dust hood in place.
Switch
The magnetic ON/OFF switch supplied with the
Planer is pre-wired to the motor. The remaining
step requires connecting the switch to the plan-
er's head casting. To attach the switch:
1. Align the holes on the flanges at the back of
the switch box with the tapped holes on the
front left corner of the head casting.
2. Using the socket head cap screws provid-
ed, attach the switch box assembly to the
head casting. See Figure 5.
The G1033 is shipped without a plug. Now would
be a good time to attach the appropriate plug
specified in Section 2: Circuit Requirements.
Figure 5. Attaching switch.
Do not attempt to make any adjustments to
this machine or perform routine mainte-
nance without unplugging it from its power
source. Serious injury could result.
DO NOT attach the dust hood if you do not
intend to connect the Model G1033 to a dust
collection system. Accumulated wood chips
could cause a malfunction, resulting in per-
sonal injury or damage to the planer.