


H0603 18V Cordless Drill and Saw
-13-
SAW OPERATIONS, CON’T
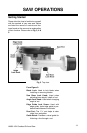
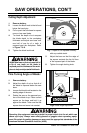
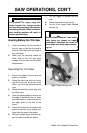
7. The arrow in Fig.8 is pointing to a
screw that operates as a positive 90°
stop. It is secured with a jam nut.
Loosen the nut and turn the screw so
that it contacts the base. Do Not over
tighten. Over tightening this screw
will cause the saw base to warp and
will upset the angle of the blade.
8. Loosen the screw on the index point-
er just to the left of the angle degree
scale. Rotate the pointer until it is
lined up with the zero degree mark.
Retighten the screw.
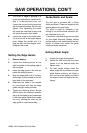
Setting Blade Angle:
1. Loosen the angle locking knob.
2. Rotate the saw base until the index
pointer is at the desired angle and
tighten knob.
3. For best results always check the
blade angle with a protractor or angle
guide before making a cut. Make a
test cut into scrap lumber and check
the angle of the cut. Readjust as nec-
essary.
Setting the Edge Guide:
1. Remove battery.
2. Loosen the retaining screw on the
right hand side of the leading edge of
the saw base.
3. Insert the edge guide in the slot just
below the retaining screw.
4. Slide the edge guide until it is insert-
ed through a slot provided on the left
hand side of the saw base.
5. Determine the width of cut needed
for your project and slide the edge
guide using the scale provided.
6. Tighten the retaining screw. Always
double check the distance between
the tip of the blade to the inside edge
of the edge guide. Blade thicknesses
can vary, causing the scale on the
edge guide to read inaccurately.
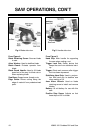
Guide Notch and Scale:
The trim saw is provided with a Guide
Notch and Scale. These are located on the
leading edge of the saw base.
The notch is used for following a line
through a cut and the scale allows an off-
set reference from a cut.
It should be noted that these are provided
for one blade thickness. Blades without
carbide teeth or with carbide teeth that are
thinner or thicker may render the guide
notch and scale inaccurate.